
Embroidered Design Essentials opens the door to a rewarding craft that blends artistry with precise technique. Whether you are just starting out, this guide helps you choose the right embroidery tools and assemble a starter embroidery kit to build momentum. A thoughtful setup reduces frustration and keeps you motivated as you progress, and each week you notice small improvements that fuel your curiosity. Quality, beginner-friendly gear and clear expectations help you turn curiosity into competence, and maintain steady progress with patient practice while keeping your workspace organized and your goals realistic. As you practice, Embroidered Design Essentials becomes a practical pathway toward confident stitches and personal style.
This approach reflects Latent Semantic Indexing principles, using related terms to broaden the topic and connect concepts like starter embroidery kit and other essentials. By framing the subject around embroidery tools and practical materials, learners see how different components support success. Considering fabric types for embroidery and the role of embroidery needles and hoops helps learners keep stitches neat and consistent. Finally, hand embroidery stitches and other techniques are explored in context to build a richer, more transferable understanding.
Embroidered Design Essentials: Building Your Core Tools for Beginners
Embroidered Design Essentials helps you focus on the gear that makes learning smoother. By starting with a thoughtful toolkit of embroidery tools and a well-lit workspace, you set the stage for steady progress. The phrase Embroidered Design Essentials signals a practical approach: choose beginner-friendly gear, align it with your goals, and your first projects will come together more confidently.
A simple, reliable tool setup reduces frustration and accelerates skill building. Pairing the right embroidery needles and hoops, selecting supportive fabrics, and stocking basic threads keeps you practicing rather than troubleshooting. As you grow, you can upgrade specific items, but the core idea remains: a focused kit puts your hands where the learning happens.
Choosing a Starter Embroidery Kit: What to Look For in a Beginner Set
A well-chosen starter embroidery kit bundles the essentials you need without overwhelming you. Look for a balanced mix of tools, a handful of colors of stranded cotton floss, and a simple practice fabric. The kit should clearly state what you’ll learn, with basic stitch patterns to guide your early sessions and pattern sheets that you can follow as you build confidence.
Check for instructions that match your learning style, such as step-by-step visuals or links to online tutorials. A beginner-friendly kit often includes a mini guide to stitches and a simple motif, like a leaf or flower, to help you translate ideas into stitches. Having a reliable starter kit reduces guesswork and keeps motivation high as you practice hand embroidery stitches.
Fabric Types for Embroidery: Picking the Right Base for Your First Projects
Fabrics shape how your stitches sit and how forgiving your work will be. For beginners, cotton muslin, cotton twill, and Aida are common choices that provide stable, even weaves for learning. Linen yields crisper definition but can feel trickier at first, so consider your comfort with tension as you start.
Pair fabrics with appropriate stabilizers to manage distortion and back-and-forth stitching. Light tear-away stabilize on delicate fabrics, cut-away for denser pieces, and wash-out pencils to mark patterns without leaving residue on the fabric. Understanding fabric types for embroidery helps you plan stitches and project progression more accurately.
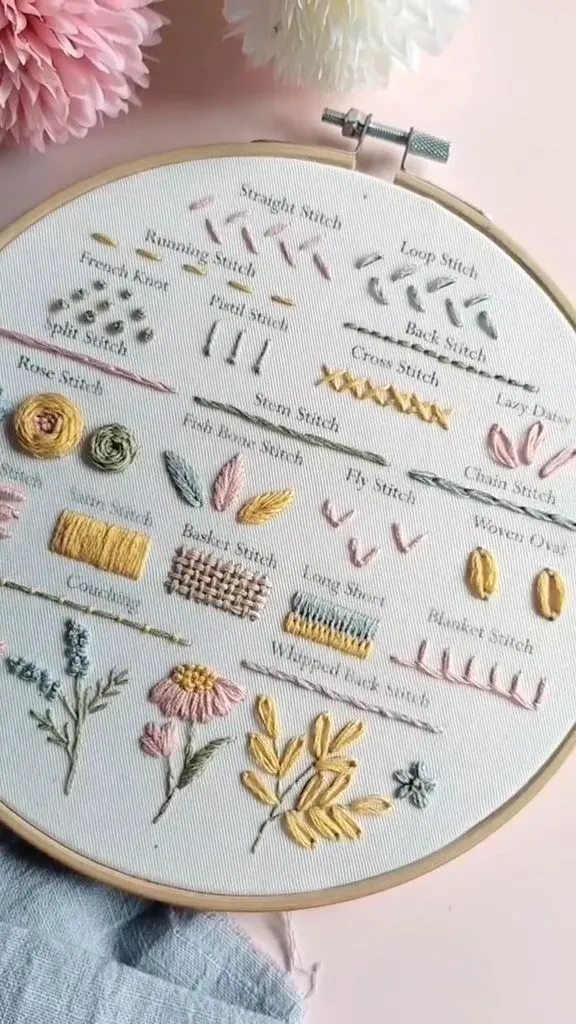
Hand Embroidery Stitches Mastery: Essential Stitches You Will Use First
Start with a core set of stitches that every beginner returns to: running stitch for outlines, backstitch for clean lines, satin stitch for fills, French knot for texture, and split stitch for dimension. Mastering these hand embroidery stitches builds confidence and gives you the vocabulary to interpret patterns.
Practice with purpose: keep stitches of even length, maintain even tension, and avoid pulling the thread too tight. If a stitch looks off, rework it rather than forcing a poor result. Regular practice with these stitches lays a durable foundation for more complex designs.
Embroidery Needles and Hoops: The Critical Pair for Smooth Stitches
The right hoop holds fabric taut, helping stitches sit evenly and reducing puckering. Cotton or wooden hoops are affordable options, and larger pieces can benefit from a scroll frame or similar structure. Pair this with the right embroidery needles and hoops to glide threads smoothly through fabric, minimizing snags.
Choose hoop size based on project area and fabric type, and select needles by thread thickness and fabric weight. A small starter set of needles in multiple sizes helps you adapt to different stitches and fabrics. Maintaining the pairing of hoops and needles becomes a natural rhythm as you progress.
From Practice to Projects: Set Up, Practice, and Progress with Confidence
Create a dedicated workspace with good lighting, a clean surface, and a place to store threads and tools. A bright lamp or magnification can make tiny stitches more comfortable, while a tidy arrangement of embroidery tools keeps you focused on learning rather than hunting supplies.
Start with short practice sessions that introduce a few stitches, then gradually advance to small projects that combine skills and color. Track progress by photographing results and noting what worked and what didn’t, so your Embroidered Design Essentials journey becomes a clear path from curiosity to competence.
Frequently Asked Questions
What are the essential Embroidered Design Essentials tools and supplies for a beginner?
Start with a stable embroidery hoop or frame, a small set of embroidery needles, sharp scissors, stranded cotton floss, fabric markers, a smooth base fabric (like cotton muslin), and stabilizers. This core bundle aligns with Embroidered Design Essentials and supports beginners as you practice basic hand embroidery stitches.
How do I choose a starter embroidery kit within the Embroidered Design Essentials framework?
Choose a starter embroidery kit that includes a hoop or frame, at least one needle set, basic scissors, several floss colors, a small practice fabric, and a simple stitch guide. A well-rounded starter embroidery kit keeps you focused on Embroidered Design Essentials rather than guesswork.
Which fabric types for embroidery are best to start with under Embroidered Design Essentials?
Begin with forgiving fabrics such as cotton muslin or cotton twill for fabric types for embroidery. If you want crisper definition, linen works later, but avoid very stretchy knits at first. Embroidered Design Essentials helps you match fabric choice to your stitch goals.
Which hand embroidery stitches should I learn first in Embroidered Design Essentials?
Learn essential hand embroidery stitches: running stitch, backstitch, split stitch, satin stitch, French knot, and seed stitch. Regular practice with these hand embroidery stitches builds a solid foundation within Embroidered Design Essentials.
How should I care for embroidery needles and hoops as part of Embroidered Design Essentials?
Care for embroidery needles and hoops by keeping needles clean, wiping away oil and lint, replacing dull blades, and storing hoops in a dry place to prevent rust. This maintenance is part of managing your Embroidered Design Essentials setup.
What steps help me progress from beginner to confident with Embroidered Design Essentials?
Progress from beginner to confident by starting with a simple project that uses basic stitches, then gradually introduce more complex patterns, different fabrics, and varied thread colors. Use a starter kit as a reference, document results, and practice regularly within the framework of Embroidered Design Essentials.
| Aspect | Key Points |
|---|---|
| Introduction | – Embroidery is rewarding; Embroidered Design Essentials helps beginners learn faster and stay motivated. – Guide focuses on essential tools and materials for beginners, how to choose wisely, and practical steps to start projects with confidence. – Building a solid foundation around tools, fabrics, and basic stitches leads to steady progress and enjoyment. – The concept: pair quality, beginner-friendly gear with clear expectations to turn curiosity into competence. |
| The concept of Embroidered Design Essentials | – Equip yourself with practical items that fit goals and skill level. – Right tools and materials matter for effective learning. – A well-structured setup reduces frustration and speeds progress. – The article covers tools, materials, starter kits, and beginner stitches to build a sustainable practice. |
| Tools you should have as a beginner | – Avoid bulk or high-end gear at the start; use a curated set of basics. – Essential tools and why they matter: – Embroidery hoop/frame, needles, scissors, threads, fabric markers, fabric, stabilizers, lighting. – Pairing needles and hoops affects stitch ease and consistency. – Start with reliable, not overly fancy, gear and upgrade as projects demand. |
| Materials you will work with: fabrics, threads, stabilizers, and more | – Fabric types: cotton muslin/twill are forgiving; linen is crisper but trickier; even-weave fabrics like Aida help alignment; avoid very stretchy knits to prevent distortion. – Threads: start with six-strand stranded cotton; you can separate strands; consider rayon for shine; metallics are challenging for beginners. – Stabilizers/backing: light stabilizers, tear-away for non-wovens, cut-away for heavier projects. – Tools maintenance: wipe needles, replace dull blades, store hoops dry to prevent rust; maintain a tidy workspace. |
| Starter embroidery kit and how to choose | – A well-chosen starter kit saves guesswork. – Look for: balanced tools (hoop/frame, needle set, basic scissors), range of threads, small practice fabric, simple pattern, and clear instructions. – If possible, select a kit with an introductory stitches guide and a simple beginner pattern. |
| Hand embroidery stitches you will likely use | – Running stitch, backstitch, split stitch, satin stitch, French knot, seed stitch. – Regular practice builds a solid foundation for more complex designs. – Tips: maintain uniform stitch length, keep even tension, avoid pulling fabric. If a stitch looks uneven, rework it. |
| A simple practice project to get started | – Choose a compact design with a few stitches (e.g., leaf motif or small flower). – Transfer design, hoop fabric, outline in backstitch or running stitch, fill with satin stitch, add a few French knots for texture. – Completing the starter project links Embroidered Design Essentials to a finished piece. |
| Care, finishing, and project progression | – Finishing: wash/soak threads to remove marks, press from the back with a pressing cloth. – Storage: keep threads wound, store fabric flat away from sunlight. – Tool longevity: clean needles, replace dull blades, store hoops dry. – Progression: after mastering basics, tackle more complex patterns, different fabrics, and color blending. |
| Common beginner mistakes and how to avoid them | – Not keeping fabric taut in the hoop: re-tension as needed. – Using overly long threads: shorten and re-thread. – Pulling too hard: maintain even tension. – Ignoring fabric properties: test on scrap fabric before starting. |
| Quick project ideas for practice | – Small floral motif on cotton muslin. – Simple initial letter/monogram on linen. – Decorative border on a napkin/handkerchief. – Beginner-friendly geometric design on scrap fabric. |
| Troubleshooting and learning resources | – If a stitch is wobbly, slow down and re-stitch after checking thread thickness. – Seek beginner-friendly embroidery books, online tutorials, and community groups. – Practice regularly, document results, and compare progress over time. |
Summary
Conclusion
Embroidered Design Essentials provides beginners with a clear path to start stitching with confidence. By selecting the right embroidery tools, choosing appropriate fabrics for embroidery, picking a thoughtful starter embroidery kit, and practicing basic hand embroidery stitches, you can create small, satisfying pieces that fuel ongoing exploration. Stay curious, be patient, and enjoy the process of turning simple threads into art. With time and practice, your understanding of Embroidered Design Essentials will deepen, and your creative voice will unfold across new designs and techniques.