
As you begin, this Embroidered design tutorial invites you to turn a simple sketch into a stitched, textile artwork, blending planning with patient handwork. You’ll discover practical steps that keep color decisions clear and stitches even, anchoring your project in actionable techniques for embroidery that work well in search results. From sketch to stitch, you’ll also learn how to transfer sketch to embroidery with reliable methods that protect proportions and clarity. The guidance is structured and repeatable, so you can reproduce successful results across projects and build confidence with each stitch. Whether you stitch by hand or use a hoop, the approach helps you create professional-looking embroidery you’ll be proud to display.
Beyond the step-by-step guide, this topic unfolds as a needlework overview that explores lines, textures, and color through alternative terms. In broader terms, you’re looking at a stitching project that covers fabric choices, tension, and how different textures translate onto the surface. The emphasis shifts to hand embroidery techniques that build depth, with tips on transfer methods, thread selection, and color blending. As you continue, consider this a design-to-stitch pathway that uses sketches as springboards for patterning and dimensional effects. Whether your aim is a small motif or a decorative panel, the principles remain the same: plan, practice, and polish for lasting results.
Embroidered design tutorial: From Sketch to Stitch – Essential Steps for Beginners
An Embroidered design tutorial helps you translate a paper idea into a stitched piece. Start by choosing motifs that suit your fabric, considering scale, line weight, and negative space. Draft a simple composition that can be broken into stitch-friendly sections. This embroidery design tutorial guides you through mapping your drawing to a stitching plan, setting you up for a clean transfer and consistent results.
With the right approach, embroidery becomes a repeatable process rather than a mystery. You’ll learn to balance line, fill, and texture while choosing fabrics that support the thread’s weight. By focusing on fundamentals—composition, color planning, and stable foundations—you can reproduce or adapt designs with confidence. The Embroidered design tutorial framework you follow helps you build a portfolio of stitched pieces that look professional and polished.
How to Transfer Sketch to Embroidery: Techniques and Tools for Accuracy
Transferring a sketch to fabric is a crucial bridge between design and stitch work. There are several reliable methods for how to transfer sketch to embroidery: tracing onto transfer paper and pressing, using a light box to trace with a pencil, or employing a water-soluble pen that vanishes as you stitch. Each method has its own pros and cons depending on fabric type and thread weight. In practice, test a few approaches on scraps to understand how lines translate onto your chosen fabric.
Accuracy matters as much as aesthetics. Secure your fabric in a hoop and prepare a clean surface so your transfer lines stay visible. Choose stabilizers suitable for your fabric—tear-away for woven linens, cut-away for knits—and match your needle size to the thread. Milestones like consistent placement of lines and even tension will translate your sketch into embroidery with clean outlines and balanced shading. Mastering transfer techniques is a core skill in any embroidery project, especially when you’re developing hand-eye coordination for precise stitches.
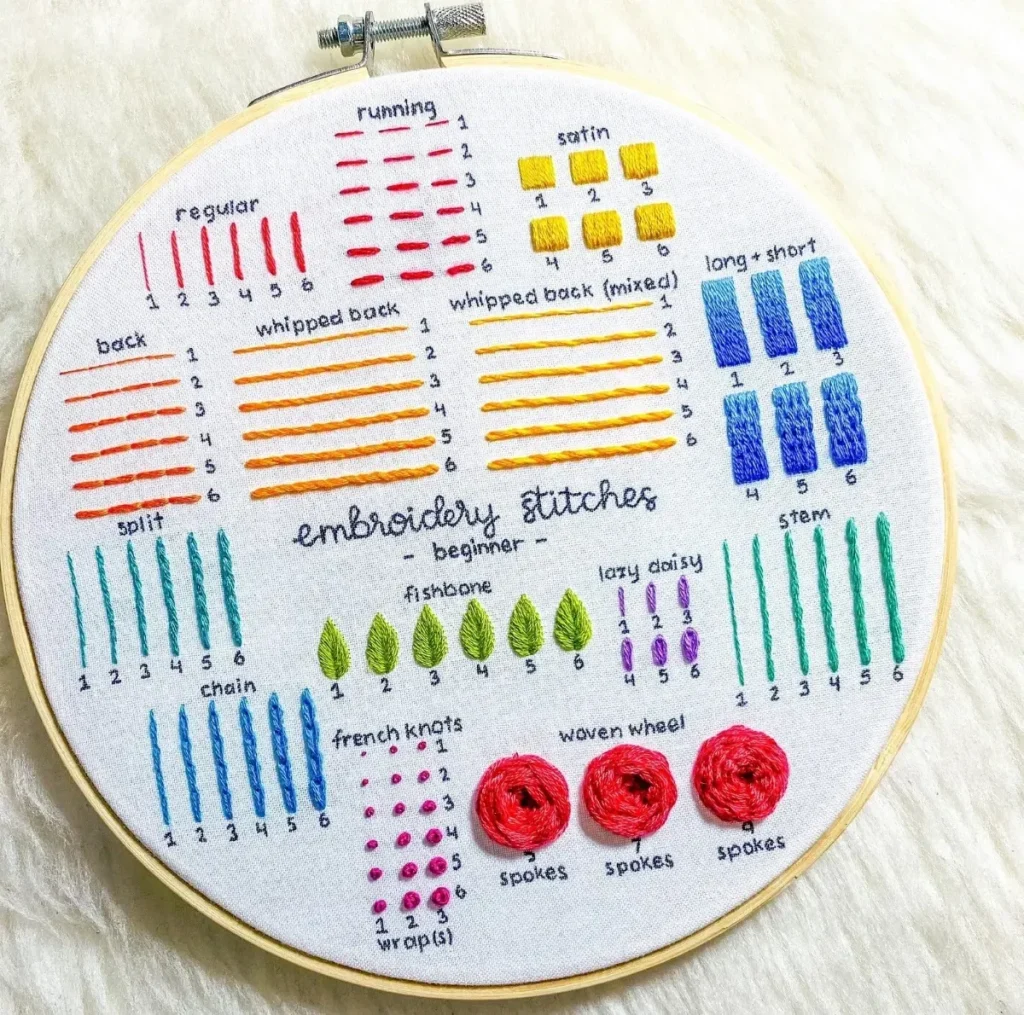
Embroidery Stitches for Beginners: Building a Solid Foundation
Embroidery stitches for beginners provide the language you’ll use to render shapes and textures. Start with a practical set: backstitch for outlines, satin stitch for filled areas, running or split stitch for texture, and the French knot for tiny details. Lazy daisy and stem stitches are excellent for petals and stems. Practicing these basics builds muscle memory and ensures your stitches sit evenly on the fabric.
As you gain confidence, practice combining stitches to create shading, depth, and movement. Vary stitch length and direction to mimic natural textures, such as fur or petals. A solid foundation of embroidery stitches for beginners makes it easier to tackle more complex motifs later, keeping your projects satisfying rather than frustrating.
Hand Embroidery Techniques: Adding Texture, Depth, and Personality
Hand embroidery techniques open up a world of texture and detail that machine work can’t easily replicate. Beyond the basics, explore shading with long-and-short stitches, couching for decorative lines, or bullion knots for raised highlights. Experiment with stitch direction to suggest light and form, and use layering to add dimension to flat shapes. These hand embroidery techniques help you achieve a hand-crafted feel rather than a flat silhouette.
Texture comes from thoughtful stitch choice and careful tension. Build layers by combining outline stitches with fill stitches, and use thread direction to guide the eye. Practice gentle knotting, secure thread tails, and plan finishing touches that protect the work while enhancing the surface. By embracing a broader set of hand embroidery techniques, you’ll elevate simple sketches into richly textured stitched designs.
Creating Embroidered Designs from Sketches: Translating Line Art to Thread
Creating embroidered designs from sketches starts with translating line art into stitched contours and filled shapes. Begin by identifying the dominant lines, key shapes, and areas that will be solid color. Decide whether to render a design with crisp outlines, soft shading, or a blend of both, then map stitches to each region. Planning this translation reduces guesswork and helps you maintain proportions as you move from paper to thread.
Color is a major design decision in creating embroidered designs from sketches. Build a limited, harmonious palette and test color values on fabric swatches. Plan shading with a few lighter tints and darker tones to convey form. Alongside color, consider stabilizers and fabric choice to keep edges crisp as you translate line art into embroidered surfaces. With careful planning, your sketch evolves into a finished thread-based artwork.
Choosing Materials and Finishing in an Embroidery Design Project
Choosing materials and finishing in an embroidery design project sets the stage for durability and display. Select fabrics that suit your design—cotton or linen for versatility—and ensure the weave supports your chosen stitches. A hoop or frame keeps fabric taut, while a range of embroidery floss or stranded cotton threads gives you color options. Add a stabilizer when working with delicate fabrics to prevent puckering and misalignment.
Finishing touches seal the piece: wash the transfer marks, press gently, trim loose threads, and consider a fabric backing or framing for display. Proper finishing also includes storage and care tips so your work lasts. This practical approach—to transfer lines cleanly, protect stitches, and present the design well—embodies the spirit of an embroidery design project, aligning with the broader goals of the guide.
Frequently Asked Questions
What is an Embroidered design tutorial and how can it help beginners?
An Embroidered design tutorial is a guided process that takes you from a simple sketch to a finished stitched piece. It covers fundamentals like motif selection, color planning, and core embroidery stitches for beginners, plus practical, repeatable steps to build confidence and produce polished results.
How to transfer a sketch to embroidery as described in an Embroidered design tutorial?
The tutorial presents reliable transfer methods to maintain proportions, such as tracing onto transfer paper and pressing, using a light box, or applying a water-soluble pen, helping you learn how to transfer sketch to embroidery accurately.
Which embroidery stitches for beginners are typically covered in an Embroidered design tutorial?
Foundational stitches like backstitch, satin stitch, running stitch, split stitch, French knot, lazy daisy, and stem stitch are introduced, forming the backbone for outlines, fills, and textures.
What hand embroidery techniques are introduced in a typical Embroidered design tutorial?
In addition to basic stitches, the tutorial covers hand embroidery techniques for shading, texture, and dimensional effects, enabling you to translate a sketch into expressive embroidery.
How can you create embroidered designs from sketches using an Embroidered design tutorial?
Begin with a simple motif, plan the composition, transfer the sketch, and then convert line art into stitched contours and filled shapes, gradually mapping color and shading onto the fabric.
How does an Embroidered design tutorial guide finishing and care for embroidered designs?
The guide explains finishing touches like washing, pressing, trimming threads, and adding backing or framing, ensuring durability and longevity so your embroidered designs stay beautiful over time.
| Aspect | Key Point |
|---|---|
| Purpose of Embroidered design tutorial | Transforms a sketch into a stitched piece; embroidery blends art and craft. |
| Fundamentals and Creativity | Emphasizes fundamentals without sacrificing creativity; learn motifs, color palettes, and repeatable steps. |
| Sketch to Final Stitch Overview | Concept → simple sketch → break into stitch-friendly sections; select fabrics and stabilizers; toolkit of stitches. |
| Materials & Tools | Medium-weight fabric (cotton/linen), hoop, embroidery floss, stabilizer; choose needle size; match thread weight to fabric. |
| Transferring Sketch | Transfer methods include transfer paper, light box, or water-soluble pen; maintain accuracy and avoid smudging. |
| Core Stitches for Beginners | Backstitch, satin, running/split stitch, French knot, lazy daisy/stem stitch; foundation for shading and texture. |
| Color & Shading | Plan a cohesive palette; layer stitches and vary lengths to create depth; map shading from sketch to fabric. |
| Practice & Projects | Start with small motifs; build a tiny series; practice stitches and color combinations to reinforce learning. |
| Finishing & Care | Wash, press, trim threads; add backing or frame; proper finishing ensures longevity and display quality. |
| Related Keywords & Practice Tips | Explore transfer methods, beginner stitches, hand embroidery techniques, sketch-to-design workflows; tips: good light, taut fabric, consistent tension, clean transfer, progress photos. |
| Big Picture | Embroidery blends art and craft; provides a repeatable framework and portfolio-building potential; mastering the process leads to confident, expressive designs. |
Summary
Embroidered design tutorial guides you from sketch to stitch, turning a simple idea into a finished textile and inviting you to explore color, texture, and form. This descriptive overview highlights how planning motifs, selecting materials, transferring designs, and mastering foundational stitches come together to create pieces that feel professional and personal. With steady practice, you’ll build confidence, expand your technique, and develop a portfolio of embroidered designs you’re proud to display or gift. Embrace the process, refine your skills, and enjoy the tangible rewards of creating with thread.