
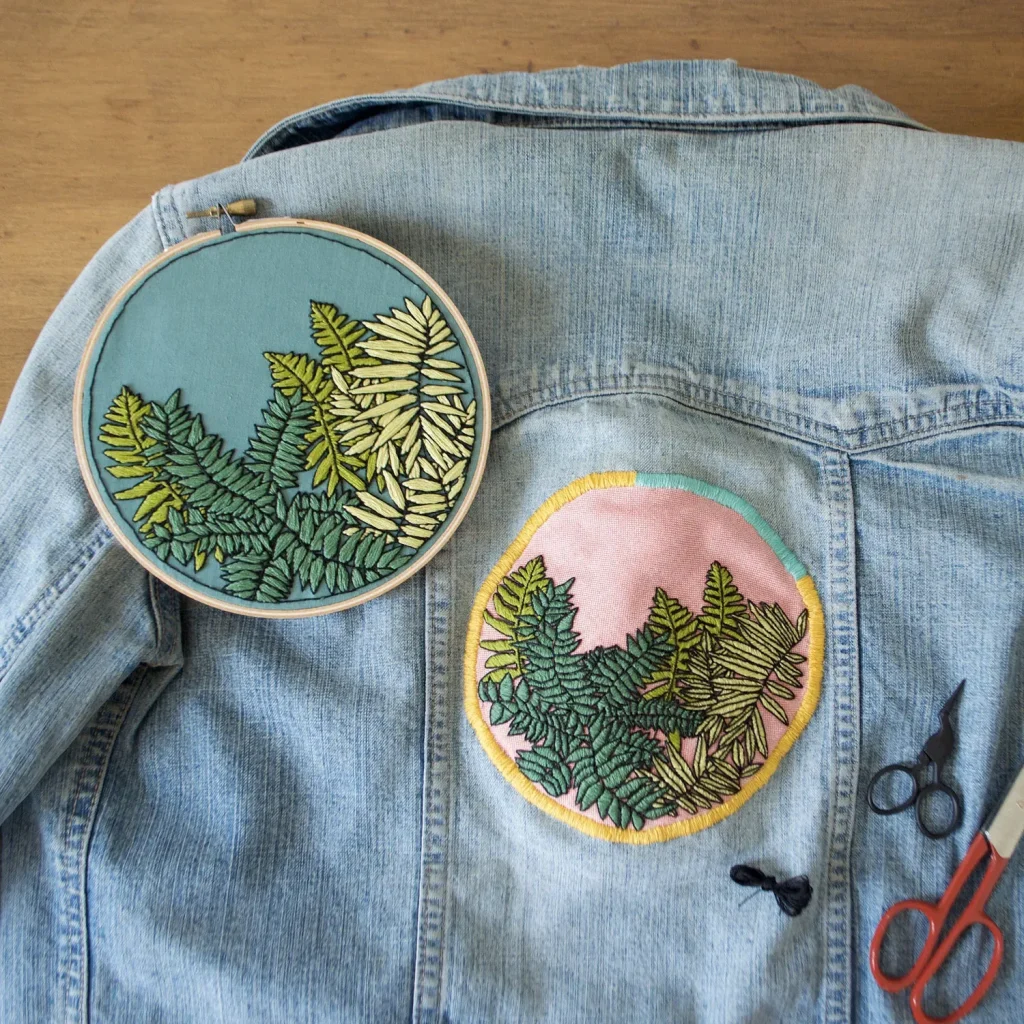
DIY embroidered patches offer a playful, affordable way to personalize jackets, backpacks, hats, and more. If you’re new to this craft, patches provide a forgiving starting point that blends creativity with practical results, making them ideal for beginner embroidery. This quick guide introduces essential techniques and materials, with a focus on patch customization and simple stitches. You’ll discover how options like iron-on patches and sewing patches can simplify the process and suit different garments. Whether you’re patching a denim jacket or a backpack, you’ll gain confidence in basic stitches and color choices—hallmarks of beginner embroidery.
Viewed through an alternative lens, these handmade fabric badges are small, versatile adornments you can tailor to any jacket, bag, or hat. Whether stitched by hand or guided by a sewing machine, they serve as friendly entry points for those practicing beginner embroidery. Common terms you might encounter include embroidered patches, fabric badges, or customizable sew-on decorations that echo the same craft idea as patch customization. The idea is to transfer a simple design, choose durable backing, and finish with a clean edge, all while exploring easy techniques that scale as you gain confidence. As your skills grow, you’ll branch into more complex motifs and color palettes, turning plain textiles into personalized statements.
DIY embroidered patches: a beginner’s guide to crafting your own iron-on patches
As a beginner in embroidery, patches offer a friendly starting point for learning stitches and finishing techniques. DIY embroidered patches let you express personal style on jackets, backpacks, hats, and more, while keeping projects approachable and quick to complete. Iron-on patches provide a fast, low-friction option for patch placement, especially for hands-on learners who want tangible results without a large setup.
Start with a simple design to build confidence, then practice basic transfers using tracing paper, water-soluble pens, or a lightbox. This approach aligns with patch customization goals, helping you choose colors and shapes that feel personal and fun. With steady progress, you’ll gain momentum in beginner embroidery while building a small, wearable collection of patches.
essential materials for beginner embroidery: from fabric and stabilizer to backings
Gather fabric scraps or felt for the patch base, stabilizer (tear-away or cut-away), embroidery floss in a selection of colors, embroidery needles, small scissors, a fabric marker or transfer pen, and tracing supplies. A dedicated embroidery hoop helps keep fabric taut and reduces puckering, which is especially important for beginners in embroidery when sewing patches.
Choose between an iron-on backing or a sew-on backing, and have an iron and pressing cloth ready. For beginner projects, organized materials and a simple toolkit keep the process smooth and enjoyable. As you patch customize your items, you’ll notice that reliable backing and fabric stability make more intricate designs feasible.
transferring your design: patterns, tracing, and lightbox strategies
A successful patch starts with a clear design. Transfer your motif onto the patch backing using tracing paper, water-soluble pens, or a lightbox. These options are common in beginner embroidery and help you stay within lines as you stitch, reducing frustration for sewing patches.
Keep transferred lines light so they don’t show through the back of the patch. For dark fabrics, lightbox tracing or window tracing can be especially helpful. This step sets the foundation for clean outlines and makes patch customization easier as you grow more confident with your stitches.
stitching techniques for patch success: backstitch, satin stitch, and more
For beginners, master a core set of stitches: backstitch for outlines, satin stitch for filled shapes, and running stitch for texture. Start with a two- or three-strand floss and maintain even tension to avoid puckering. These basic stitches are the building blocks of quality DIY embroidered patches.
Finish with a neat edge using a blanket stitch or whip stitch around the border. Practice on small samples to build confidence before tackling a larger patch, and let rhythmic stitching contribute to your patch customization journey. As you progress, you’ll find that color layering and edge finishing elevate your projects in meaningful ways.
attachment options: iron-on patches vs sew-on patches for longevity
Iron-on backing provides a quick bond: place the patch, cover with a pressing cloth, and press with a hot iron for 10–15 seconds. Let it cool completely to set the adhesive. This option is popular for easy, beginner-friendly embroidered patches and is a great way to see results fast.
Sew-on backing offers durability, especially for items that will be washed frequently or exposed to friction. Pin the patch in place and stitch a running or whip stitch around the edge for a secure finish. This approach aligns with traditional sewing patches and supports long-lasting patch customization on garments and accessories.
creative patch customization ideas to personalize clothes and accessories
As you gain confidence, explore monograms, initials, themed designs, and mixed-media textures. Patch customization lets you layer embroidery with fabric appliqué or small beads for depth, turning simple patches into statement accessories that reflect your personality.
Practical project ideas for beginners include tiny emblem patches on denim, coordinating backpack decorations, or gift patches on totes. By starting with simple shapes and gradually adding color gradients, you’ll move from beginner embroidery toward more ambitious patch-making while keeping creativity at the core.
Frequently Asked Questions
What are DIY embroidered patches and why are they a good fit for beginner embroidery?
DIY embroidered patches are fabric shapes embellished with embroidery that you can attach to jackets, backpacks, and more. They’re beginner-friendly because designs can be simple, stitches basic, and you can choose iron-on patches or sew-on backing for easy patch customization.
How can I start making DIY embroidered patches for a jacket using beginner embroidery techniques?
Begin with a simple design, transfer it to your patch base, and secure it in a hoop. Learn a few basic stitches—backstitch for borders, satin stitch for fills, and running stitch for details. Decide on iron-on backing for quick attachment or sew-on for durability in DIY embroidered patches.
Are iron-on patches a practical option for DIY embroidered patches, and how do I apply them safely?
Iron-on patches make DIY embroidered patches quick to attach. Place a pressing cloth, set the iron to the recommended heat, apply evenly for 10–15 seconds, then cool completely. For items that wash often, a sew-on backing may be more durable.
What materials do I need for DIY embroidered patches, and how should I choose a base for patch customization?
You’ll need fabric scraps or felt, stabilizer, embroidery floss, needles, scissors, a fabric marker or transfer tool, and an iron-on or sew-on backing, plus an iron. For patch customization, pick a sturdy base and consider color compatibility and visibility on your garment.
What common mistakes should beginners avoid when making DIY embroidered patches?
Common issues include puckering from poor tension, loose edges, color bleeding, and backing failures. To fix them, re-hoop with firmer stabilizer, secure the edge with a border stitch, choose colorfast threads, and test backings before final attachment.
What are easy ideas for patch customization with DIY embroidered patches for beginners?
Try monograms, simple icons (stars, hearts), themed designs, or short quotes. Use two to three colors to keep it manageable, and consider gradients or small beads as a light touch to enhance your DIY embroidered patches.
| Topic | Key Points |
|---|---|
| Focus keyword | DIY embroidered patches |
| Related keywords |
|
| Post Title | DIY Embroidered Patches: A Beginner Step-by-Step Guide |
| Meta Description | Discover how to make DIY embroidered patches with this beginner-friendly, step-by-step guide. Master basic stitches, ironing tips, and patch customization. |
| Introduction Summary | DIY embroidered patches are a fun, affordable way to personalize jackets, backpacks, hats, and more. This beginner-friendly guide helps you learn essential techniques and finish a patch that looks neat enough to wear or gift. |
| Materials You’ll Need |
|
| Step Highlights | Step 1 Design and Pattern Transfer; Step 2 Stabilizing and Cutting; Step 3 Stitches and Techniques; Step 4 Attaching Backing and Finishing |
| Stitches & Techniques | Backstitch, Satin stitch, Running stitch, Blanket stitch or whip stitch around the edge; start with a simple color palette (2–3 colors); keep tension steady and use a light stabilizer if puckering occurs. |
| Care & Troubleshooting | Puckering: use firmer stabilizer and re-hoop; Loose edges: re-stitch; Color bleeding: use colorfast threads and test; Backing failing: try a different backing or add extra stitch along the border. |
| Ideas & Variations | Monograms; Themed designs; Mixed-media patches; Lettering and numbers; Mixed color gradients |
| Practical Project Ideas | Tiny emblem patches on denim; Backpack decorations; Gift patches |
| Final Recap | DIY embroidered patches are approachable; practice basic stitches; patch customization grows with you |
Summary
DIY embroidered patches offer a tangible blend of creativity and practicality. This descriptive overview highlights how a clear design, sturdy materials, and a handful of core stitches—backstitch, satin stitch, running stitch, and a neat edge—enable you to produce patches that look professional and wear well. Starting with simple designs and gradually exploring patch customization helps beginners build confidence and skill. As you gain experience, you can experiment with monograms, themed designs, and mixed-media details to create unique, wearable art. Embrace the learning process, enjoy color experimentation, and watch your DIY embroidered patches journey unfold into more ambitious embroidery projects.