
This article explores creative patch ideas as a way to transform plain garments into wearable storytelling. From embroidered patches ideas, leather patches ideas, to 3D patches, you’ll discover textures, materials, and inspirational backing options. DIY patch ideas are accessible to beginners and satisfying for experienced crafters alike. Optimizing for search engines, we weave in related terms like patch design inspiration to help you find the best techniques. Whether you’re updating a denim jacket, backpack, or hat, this guide helps you shape a unique, personal motif.
Alternative terms for this craft include fabric insignias, textile emblems, and decorative patches that add character to jackets, bags, and hats. These concepts share the same core idea as creative patch ideas—blending motif, material, and method—while using related terms to broaden search visibility. By connecting embroidery, leather, and 3D patches through shared themes like travel, nature, and branding, you create LSI-friendly connections that improve search visibility. If you’re designing for a personal project or a small collection, consider how backing, texture, and color influence perception and durability.
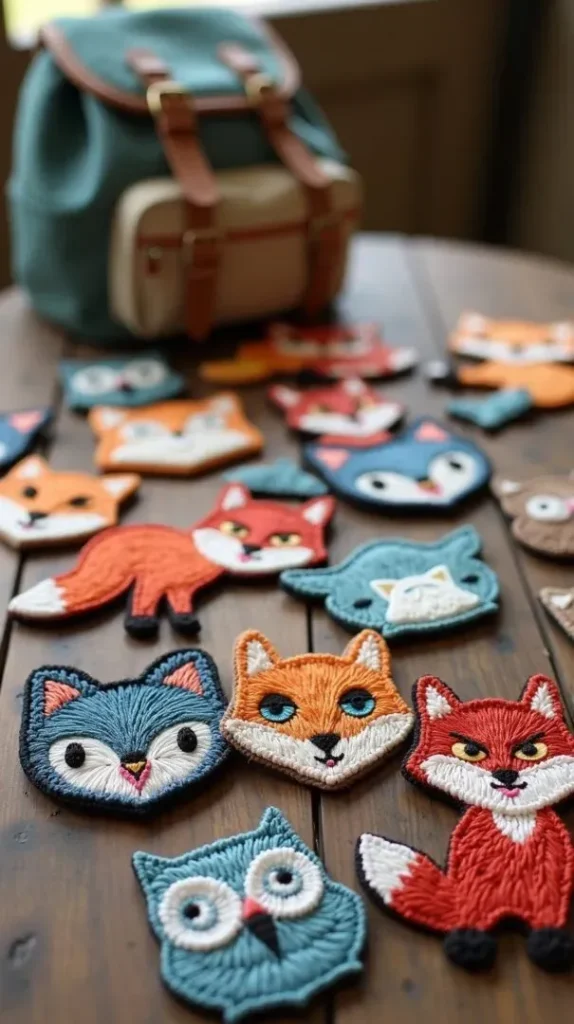
Embroidered Patches: Timeless Style and Creative Patch Ideas
Embroidered patches have long been the backbone of personalizing garments, accessories, and small-brand identities. Precise stitching, durable fabric bases, and an almost unlimited range of shapes and motifs make embroidered patches a versatile canvas for expression. When you explore embroidered patches ideas as part of your Creative patch ideas, you can blend vintage florals on denim with bold geometric outlines on a tote to create a mood that feels both nostalgic and modern.
For beginners, this patch style is approachable if you start simple. Use a stabilizer, hoop the fabric securely, and choose a clear color palette. Backing options matter too: iron-on backs are convenient for quick projects, while felt or woven backings provide more rigid support for heavier designs. As you plan, consider how outline color contrasts with fill to ensure visibility and impact.
Leather Patches: Rugged Sophistication for Everyday Wear
Leather patches bring a distinctive texture and durable vibe that pairs well with denim, leather jackets, and bags. When you’re exploring leather patches ideas, start with small, simple shapes and a single-color stamp or laser-engraved design to respect the natural grain. Placement matters: a tiny emblem on a cap looks different from a large patch on a biker jacket.
Use full-grain or top-grain leather for longevity, and finish edges with a clean burnished border or precise stitching to prevent fraying. Backing options vary from adhesive-backed patches to sewn-on patches, so test your method on scrap fabric before committing. Leather patches can also be combined with embroidery for a layered look that adds depth and a premium feel.
3D Patches: Texture, Depth, and Dynamic Design
3D patches introduce a sculptural touch that catches light and invites touch, lifting jackets, backpacks, and hats from flat to tactile. These patches use foam or soft batting beneath embroidery to create raised surfaces that stay visible across folds and wear. When planning 3D patches, plan a strong silhouette so the raised elements remain legible from a distance.
The color strategy for 3D patches can be bold and saturated to emphasize depth, or monochromatic with contrasting textures to highlight form. The stitching usually blends machine embroidery for the base with hand-sewn finishes to secure top textures, and you’ll want to test how the patch behaves through washing on swatches before attaching it to a garment.
DIY Patch Ideas: Getting Creative at Home
DIY patch ideas empower you to tailor patches to your exact taste, using a mix of fabrics, threads, stabilizers, and scraps. Start with a simple concept—nature motifs, travel-inspired symbols, or a mascot—and build from there. A common approach is to layer different patch styles on the same item to create a dynamic, curated look.
Practical steps to begin: define your design, choose your backing and stabilizer, hoop for precision, trim edges with a clean border, and decide on a backing method (iron-on, sew-on, or removable Velcro). If you’re patching items that will be washed often, choose tarnish-resistant threads and color-safe dyes, and always test care methods on scraps first.
Patch Design Inspiration: Colors, Backings, and Cohesion
Patch design inspiration starts with color theory and contrast. On light fabrics, dark patches with bold outlines tend to pop, while on dark fabrics, lighter or metallic threads can create striking contrast. When you blend embroidered, leather, and 3D elements, aim for a cohesive color palette and a unifying motif so the different textures read as a single collection.
Backing and attachment choices influence both look and longevity. Iron-on backs are convenient for beginners, but may not survive repeated washing; sew-on patches offer durability for denim and leather, while Velcro backings enable removable patches on bags or hats. Plan your layout on swatches first and test several backings to balance aesthetics and practicality.
Mixing Patch Styles: Embroidery, Leather, and 3D for a Cohesive Wardrobe
Mixing embroidery, leather, and 3D patches creates focal points while telling a unified story across a garment or bag. Start with a dominant embroidered patch as the centerpiece, then flank it with leather patches for texture and a small 3D element to add tactile interest. The goal is a cohesive wardrobe where each patch type complements the others rather than competing for attention.
As you design, think in terms of a short design language—shape, color, and scale—that carries across patch types. Practical examples include a vintage floral embroidered patch paired with a leather badge and a tiny 3D badge on the sleeve; always consider care, washing, and attachment methods to ensure the patchwork stays vibrant through time.
Frequently Asked Questions
How can I get started with DIY patch ideas within Creative patch ideas for a denim jacket?
Getting started with DIY patch ideas begins with a simple concept. Choose a motif, gather fabrics, stabilizers, and backing (iron-on, sew-on, or Velcro), and plan placement before attaching. Use a stable base and basic stitches to keep your project neat, which keeps your Creative patch ideas approachable for beginners while leaving room to experiment.
What should I consider when using embroidered patches ideas as part of Creative patch ideas?
For embroidered patches ideas, select a fabric base that supports stitching and a suitable backing. Use satin stitches for outlines and fill stitches for larger areas; start with simple shapes like stars or initials. Consider color contrast and a clean border (satin or merrow) to ensure durability and a cohesive look within your Creative patch ideas.
How do leather patches ideas fit into your Creative patch ideas, and how do I apply them?
Leather patches ideas add rugged texture. Choose full- or top-grain leather, decide between adhesive-backed or sewn-on patches, and finish edges to prevent fraying. Layer with embroidery for depth, and test adhesion or stitching on scrap fabric first to ensure durability in your Creative patch ideas.
What design tips make 3D patches effective in Creative patch ideas for jackets or bags?
3D patches use foam or sculpted bases under embroidery to create raised textures. Plan a strong silhouette so raised elements stay visible on movement or folding. Use bold colors for impact or a monochrome palette with varied textures to emphasize depth in your Creative patch ideas.
How can you mix DIY patch ideas with patch design inspiration to create a cohesive look across items?
Aim for a unifying theme (such as space, nautical, or botanical) and a shared color palette. Combine embroidered, leather, and 3D elements thoughtfully and lay out patches before attaching to ensure balance. A cohesive layout and consistent borders help your patch collage read as a single Creative patch ideas project.
What are the best backing, placement, and care practices for Creative patch ideas across embroidered, leather, and 3D patches?
Choose backing that balances durability and washability: iron-on for quick projects, sew-on for longevity, or Velcro for removables. Place patches with proportional sizing (centered on the chest, along sleeves, or on the back). Care varies by material—embroidered patches tolerate gentle washing, leather patches require wiping and conditioning, and 3D patches may collect dust and benefit from a soft brush to maintain your Creative patch ideas.
| Topic | Key Points | Notes |
|---|---|---|
| Overview | Patch ideas blend technique, material choices, and inspiration to transform garments into wearable art; three primary styles guide Creative patch ideas. | Emphasizes practical tips for both beginners and seasoned crafters. |
| Embroidered Patches | Stitches (satin for outlines, fill for large areas); start with simple shapes; ensure stability via stabilizer and hooping; consider backing types (iron-on, felt, woven); plan color contrast and dimension. | Best on denim jackets, bags, and other fabrics; mood and texture vary with design. |
| Leather Patches | Texture and durability; choose full- or top-grain leather; edge finishing; backing options (adhesive-backed or sew-on); test care methods; combine with embroidery for depth. | Suitable for denim, jackets, and bags; adds rugged refinement. |
| 3D Patches | Raised textures using foam or sculpted materials; mix machine embroidery with hand-sewn elements; design with strong silhouette; bold or monochromatic color schemes; consider wash durability. | Great on jackets, backpacks, and hats; visual impact varies with orientation. |
| DIY Patch Ideas | Materials diversity (fabrics, threads, stabilizers, leather scraps, recycled patches); combine patch styles on one item; steps: design, backing, hooping, trimming, backing choice; use tarnish-resistant threads and color-safe dyes. | Begin with simple concepts; test on scrap fabric; planning boosts success. |
| Backing & Attachment | Backings influence ease and durability: iron-on for quick projects, sew-on for durability, Velcro for removability; test washes on swatches; consider mixed backing for multi-style patches. | Removable options add versatility for mixed-use items. |
| Sizing & Placement | Scale patches to garment; use placement rules (chest area on jackets, upper sleeve, center back); layout patches before attaching to visualize composition. | Visual balance and cohesion are key. |
| Maintenance & Care | Care varies by material: embroidery tolerates gentle washing, leather requires wipe-clean and conditioning, 3D patches may collect dust; detach before washing when possible; regular upkeep preserves color and texture. | Prevents wear and keeps patches vibrant. |
| Patch Design Process | Brainstorm theme, select materials and care requirements; build a color palette; prototype on scrap fabric; finalize design, cut leather if used, prepare backing; apply and test wash/wear. | A structured workflow yields professional results. |
| Case Studies | Demonstrates how embroidered, leather, and 3D patches can complement each other for a cohesive look; examples include embroidered focal points with leather accents and a 3D badge for texture. | Shows practical, real-world applications across garments and accessories. |
Summary
Creative patch ideas open a world where texture, color, and storytelling turn ordinary garments into wearable art. This guide highlights three popular styles—embroidered, leather, and 3D patches—along with DIY approaches, backing choices, placement tips, and care requirements to help you craft cohesive, durable looks. Practical steps are provided for beginners and experienced crafters alike, including design tips, color strategies, and examples of how patches can work together on jackets, bags, hats, and more. By following a clear design process, selecting suitable materials, and testing finishes, you can build a personal patch wardrobe that expresses your style while standing up to daily wear.