
DIY embroidered design for home decor offers a satisfying way to personalize living spaces while developing a new skill. Whether you’re starting from scratch or revisiting a long-time hobby, embroidery can transform everyday textiles into charming focal points that echo your style. In this guide, you’ll discover practical techniques, project ideas, and reliable tips to help you master the craft, including hand embroidery tutorials for home decor, from choosing fabrics to coordinating stitches and color palettes. If you’re looking for inspiration, embroidered home decor ideas—along with patterns for home decor embroidery—often begin with a simple motif and evolve into a cohesive collection that ties a room together. From DIY embroidery pillows to embroidery wall art ideas, you can create meaningful, hand-crafted pieces that reflect your taste.
Beyond the basics, this craft can be described as hand-stitched textile embellishment for interiors, or decorative needlework that adds texture to cushions, wall hangings, and throws. Think of it as fabric embellishment and stitch-based art that personalizes spaces with tactile color and pattern. The practice blends sewing skills with interior design, enabling you to create hand-stitched cushions, framed textile art, and other fabric accents that harmonize with your room. Exploring color theory, stitch varieties, and modular design strategies can help you build a cohesive collection of pieces that coordinate with furniture, lighting, and decor accents.
DIY embroidered design for home decor
DIY embroidered design for home decor offers a satisfying way to personalize living spaces while developing a new skill. Whether you’re starting from scratch or revisiting a long-time hobby, embroidery can transform everyday textiles into charming focal points. In this guide, you’ll discover practical techniques, project ideas, and reliable tips to help you master the craft. The goal is to provide actionable steps that are easy to follow, whether you’re decorating a cozy living room, a child’s room, or a stylish studio. If you’re looking for inspiration, know that embroidered home decor ideas often begin with a simple motif and evolve into a cohesive collection that ties a room together. From pillows to wall art and beyond, this approach makes it possible to create meaningful, hand-crafted pieces that reflect your style.
What makes the DIY embroidered design for home decor appealing is its versatility. You can tailor the complexity of a project to your schedule and budget, choosing simple lines for quick wins or detailed florals for a weekend challenge. The process itself is meditative, offering a creative rhythm of planning, stitching, and finishing that can be both relaxing and rewarding. As you read on, you’ll see how to select fabrics, choose stitches, and plan color palettes that align with your interior themes. The emphasis remains on quality finishes, durable materials, and projects that are both beautiful and functional.
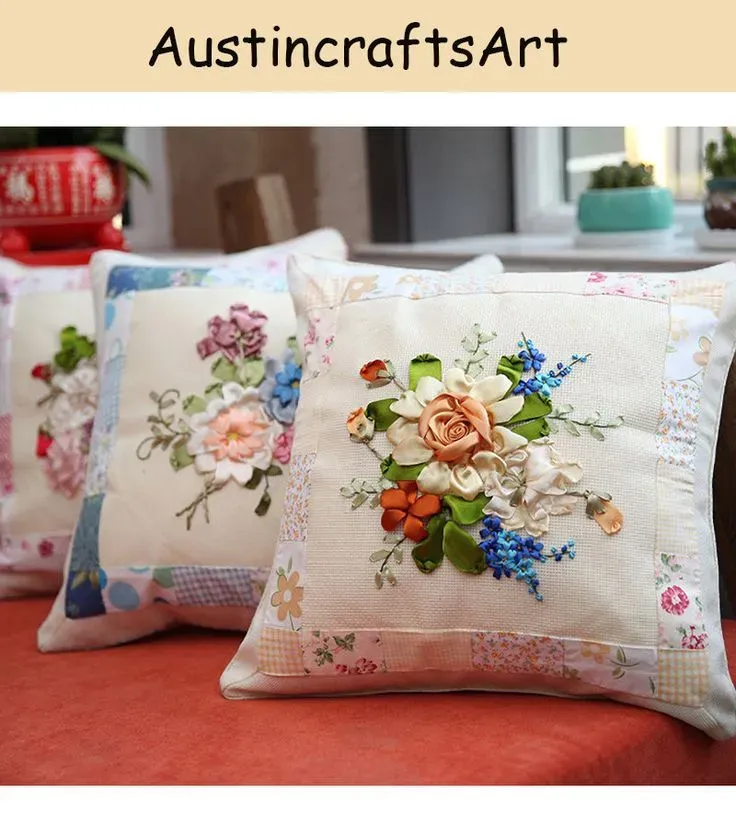
Embroidered Home Decor Ideas: From Pillows to Wall Art
Embroidered home decor ideas span a range of textiles, from cushions and throws to framed pieces that resemble gallery art. Start with accessible projects like DIY embroidery pillows to practice texture and stitch variety, then expand into embroidery wall art ideas that transform fabric into framed statements. This approach helps you build a cohesive look across a room, tying together color, pattern, and texture with simple motifs.
Pillows and wall art offer flexible entry points for exploring patterns for home decor embroidery. A straightforward geometric motif or a botanical element can become a focal point that complements existing furnishings. By pairing embroidered accents with neutrals or bold color pops, you’ll create a curated mood that feels intentional and inviting across upholstery, bedding, and wall displays.
Starting with Simple Stitches: Hand Embroidery Tutorials for Home Decor
Beginning with easy stitches lays a solid foundation for broader projects. Hand embroidery tutorials for home decor often cover basic stitches, transfer methods, and finishing touches, making it approachable for beginners while still useful for seasoned crafters. By focusing on reliable stitches like backstitch, running stitch, satin stitch, and French knots, you can build confidence and gradually tackle more complex patterns for home decor embroidery.
As you gain familiarity, you can explore patterns for home decor embroidery that scale in complexity. Start with small motifs and simple color palettes, then layer on details, shading, and texture. This progression mirrors how many embroiderers expand from embroidered home decor ideas to larger wall displays or coordinated pillow sets, reinforcing skill growth while keeping projects enjoyable and achievable.
Choosing Fabrics and Threads for Cozy Embroidered Accents
Fabric choice drives the look and usability of embroidered pieces. Options like cotton, linen, or comfortable blends work well for home decor projects. Pair stable fabrics with appropriate stabilizers to manage puckering on larger items, such as cushions or wall hangings. Selecting fabric that suits your room’s style—soft neutrals for a calm vignette or rich textures for a dramatic focal point—helps ensure your embroidery remains durable and attractive.
Thread selection and finishing details complete the effect. Use embroidery floss or perle cotton in a controlled palette, keeping color families cohesive with the room’s scheme. Stabilizers, hoop tension, and careful finishing—whether hand-stitched hems or neat pillow closures—contribute to a polished result. When you combine mindful fabric and thread choices with patterns for home decor embroidery, you’ll produce pieces that feel both personal and ready for everyday use.
Color Theory and Composition in Embroidered Home Decor
Color is a powerful tool in embroidery. Planning tones that suit your lighting and existing textiles helps you create harmony or define a bold accent. Cool blues and greens can establish a tranquil mood, while terracotta, coral, and mustard introduce warmth and energy. A foundation approach is to pick a neutral base fabric and carry color through a focal motif, then expand with subtle shading or gradients for depth.
Composition matters as much as color. Consider negative space to guide the viewer’s eye and prevent visual clutter. Patterns for home decor embroidery thrive when motifs are balanced with the surrounding textiles and furniture. For beginners, coordinating with embroidery wall art ideas can provide a framework for how to place a design on a wall-friendly substrate, while advanced projects might explore layered colors and complex line work.
Projects to Try That Deliver Quick Wins: Pillows and Wall Art
Starting with a quick-win project like embroidered pillows can deliver immediate satisfaction. Use simple patterns, sturdy canvases, and durable closures to create decorative cushions that are easy to mix and match with your sofa or bed. The pillow project is a practical entry point for experimenting with stitches, color blocking, and texture without a long lead time.
Another accessible path is to translate fabric embroidery into wall art ideas. Framing a stitched panel on linen or cotton expands your display options and lets you experiment with composition and scale. As you explore patterns for home decor embroidery, you’ll find that these two project types—pillows and wall art—offer strategic opportunities to showcase your growing skills and quickly build a personalized home gallery.
Frequently Asked Questions
What is the DIY embroidered design for home decor and why is it appealing?
DIY embroidered design for home decor offers a satisfying way to personalize living spaces and develop a new skill. It’s versatile for beginners or long-time hobbyists and works on items like pillows and wall art. You can start with simple motifs and grow into a cohesive collection that ties a room together. It’s meditative, rewarding, and customizable to fit your decor style.
How can I start with DIY embroidery pillows for home decor?
To begin DIY embroidery pillows for home decor: choose a compatible fabric (cotton duck or linen blend); secure a section in an embroidery hoop; transfer your motif with a water-soluble pen; pick beginner stitches (backstitch, satin stitch, running stitch); stitch steadily and finish the edges before assembling the pillow cover. This project builds confidence and texture without a big time investment.
What are embroidery wall art ideas for the DIY embroidered design for home decor?
Embroidery wall art ideas include framing a stitched piece on linen or cotton, stretching fabric over a small canvas, or mounting it on a gallery frame. Focus on composition and negative space, start with a simple motif, and then add botanicals or geometric accents. Coordinate colors with your room to create a cohesive look, turning your embroidery into gallery-style wall art ideas.
Where can I find hand embroidery tutorials for home decor and what do they cover?
Hand embroidery tutorials for home decor guide you from basic stitches to finishing touches. They typically cover transfer methods, tension control, stitch types (backstitch, satin stitch, French knots), and project workflows. Many tutorials also point to patterns for home decor embroidery so you can practice on smaller motifs before tackling larger pieces.
How do I choose patterns for home decor embroidery and plan color palettes?
When selecting patterns for home decor embroidery, consider your space theme and mood—botanical, geometric, whimsical, or traditional motifs work well. Plan color palettes by starting with a neutral base fabric and using 2–4 colors for the focal motif, adding a metallic or contrasting shade as an accent. Coordinate patterns for home decor embroidery with existing textiles to create a cohesive, balanced look.
What care and finishing tips help my DIY embroidered design for home decor last longer?
Care tips include gentle washing according to fabric labels, laying flat to dry, and pressing from the backside with a low heat setting. For wall art, frame with UV-protective glass to preserve colors; for pillows, finish edges cleanly and consider durable closures. Use colorfast threads and avoid prolonged direct sunlight to maintain vibrancy and integrity over time.
| Aspect | Key Points |
|---|---|
| Purpose and benefits | Personalize living spaces, develop a new skill, transform textiles into focal points; provides actionable steps for decorating different rooms; supports simple motifs to cohesive collections. |
| Versatility and approach | Projects can scale with schedule and budget; the process is meditative and rewarding, balancing quality finishes with beauty and practicality. |
| Planning and vision | Define spaces and mood; select motifs and surfaces; plan fabric, thread weights, hoop sizes; consider wash-ability and care. |
| Materials and tools | Basic supplies (embroidery hoop, needles, floss), suitable fabric; stabilizers and backing; transfer tools; optional sewing machine and finishing needles. |
| Projects to start | Pillows and wall art as entry points; consider fabrics, color palettes, and how designs relate to room textiles. |
| Pillows: steps | Cut fabric; hoop; transfer motif; choose stitches; stitch steadily; finish edges; add cording/piping if desired. |
| Wall art ideas | Frame on linen or cotton, mount on wood or canvas; stretch fabric over canvas or attach to dowel; explore minimal to botanical designs. |
| Stitches and technique | Maintain consistent tension; start with easy stitches; secure tails; limit color palette (2–4 colors); practice on scrap fabric. |
| Color theory and design | Consider room lighting; base neutral fabrics with colorful focal motifs; use gradients or shading for depth; coordinate with other decor elements. |
| Care, finishing, presentation | Follow fabric care labels; wash/dry appropriately; frame or display with protective considerations; avoid direct sunlight for longevity. |
| Finding designs and inspiration | Use books, pattern packs, craft communities; adapt motifs to space; consult tutorials for stitches and transfers. |
| Advanced tips and troubleshooting | Re-tension as needed; adjust stabilizers; break large designs into sections for even results; choose mounting methods that keep pieces flat. |
Summary
Conclusion: start small, dream big