
DIY Embroidered Design opens as a portable, relaxing craft that fits neatly into weekend plans. For weekend craft projects seeking tangible results without long timelines, this hobby offers a welcoming entry point. This guide blends Beginner embroidery projects with step-by-step embroidery lessons to build confidence and skill. From simple starter pieces to personalized gifts, it remains approachable and enjoyable for first-timers. As you stitch, you’ll discover embroidered design ideas and hand embroidery techniques that celebrate your personal style and creativity.
From a needlecraft standpoint, this concept reads like portable textile art you can start, pause, and resume during a busy weekend. The emphasis remains on approachable steps, reliable tools, and color-tested motifs—elements you’ll recognize in Beginner embroidery projects and step-by-step embroidery lessons. Think of embroidered design ideas as a growing toolkit of stitches and color combinations, supported by hand embroidery techniques. Viewed this way, DIY Embroidered Design becomes a flexible framework for small, satisfying weekend craft projects.
DIY Embroidered Design: A Beginner-Friendly Weekend Craft Journey
DIY Embroidered Design isn’t just a hobby; it’s a portable, relaxing craft that fits neatly into weekend schedules. Framing embroidery as a series of small, achievable steps makes progress visible with every stitch, a perfect fit for hand embroidery techniques and the idea of embroidered design ideas coming to life through practice. This approach echoes weekend craft projects that deliver tangible results without long timelines while offering a friendly entry into step-by-step embroidery lessons.
Begin with a simple starter kit and a clear plan for your first project. A stable fabric, a 6 inch hoop, a basic set of sharp needles, and a modest color palette are all you need to start. As you gain confidence, you can expand to more complex threads and stitches, turning a simple hoop into a sample of the DIY Embroidered Design ideas you will build upon in future projects.
Essential Tools and Setup for Beginner Embroidery Projects and Hand Embroidery Techniques
To keep weekend sessions smooth, assemble a reliable, beginner friendly setup. The core items from the guide—fabric, embroidery hoop, needles, threads, transfer tools, scissors, and a thimble—form the backbone of beginner embroidery projects and hand embroidery techniques you will use again and again.
Choosing the right hoop size and fabric weight matters. A 6 inch hoop is a versatile starting point, while 8 or 9 inch hoops suit larger designs. Stabilize your fabric to improve stitch alignment and practice a steady grip as part of your step-by-step embroidery lessons, reducing frustration while you gain control over each stitch.
Step-by-Step Embroidery Lessons: From Simple Stitches to Embroidered Design Ideas
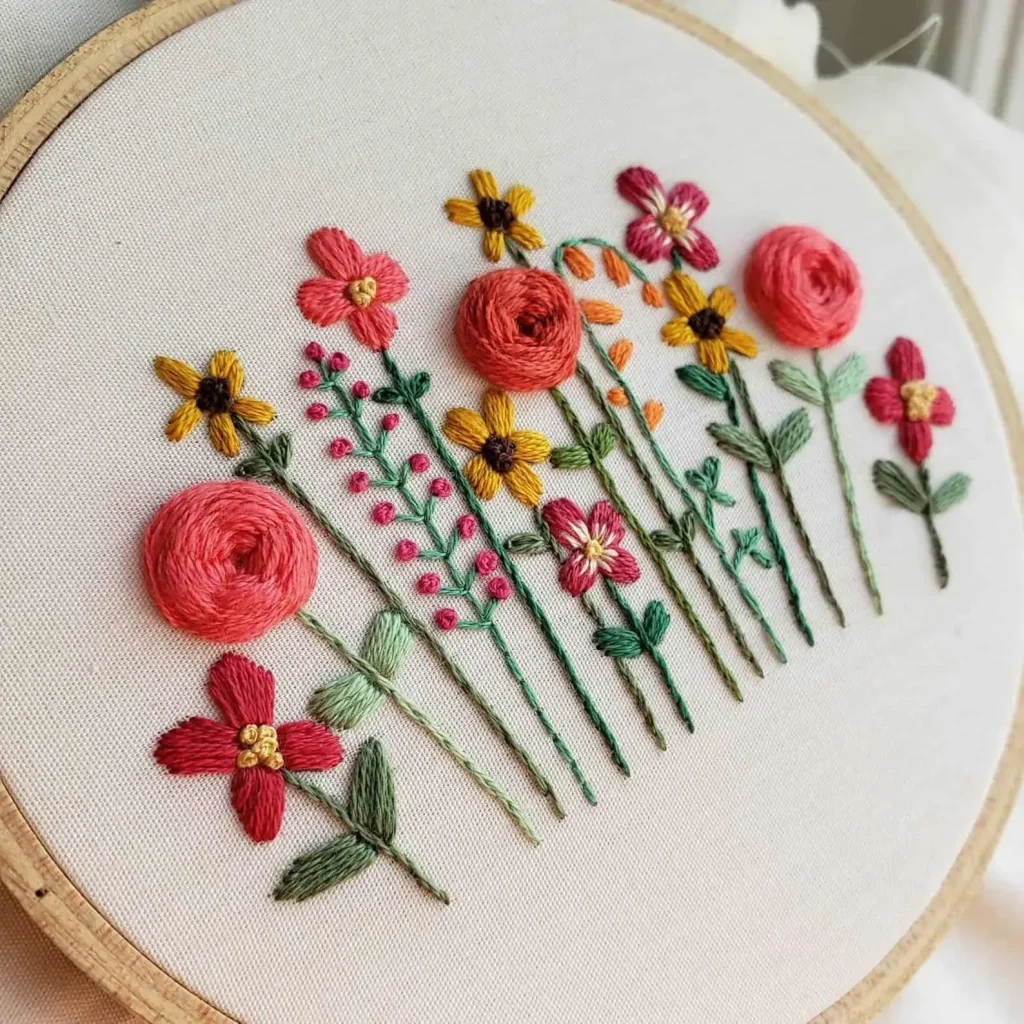
Structured lessons help you map progress from basic backstitch to Satin stitch, running stitch, and French knots. Each stitch teaches technique while contributing to embroidered design ideas you can actually use in projects for wall art, gifts, or personal items. Following step-by-step embroidery lessons keeps your practice focused and rewarding.
Keep a small learning journal to record what works and where tension or color choices trip you up. This habit turns practice into a personalized guide for future DIY Embroidered Design efforts and accelerates the path from beginner embroidery projects to more complex designs.
Weekend Projects You Can Finish: Wall Art, Napkins, Denim Patches, and Gift Tags
Four approachable weekend projects illustrate the versatility of a DIY Embroidered Design mindset while staying within a weekend time frame. A simple hoop art piece, a monogram on napkins or towels, a denim patch, and a gift tag all demonstrate how beginner embroidery projects can produce tangible, useful results.
Each project uses core stitches such as backstitch, satin stitch, running stitch, and small French knots, reinforcing techniques while letting you experiment with color palettes and textures. Finish with a little framing, a crisp edge, or mounting on fabric to maximize display value and motivation to continue weekend craft projects.
Advanced Tips for Expanding Your Hand Embroidery Techniques While Keeping It Weekend-Friendly
When you’re ready to push beyond basics, try more complex motifs, different fabrics, and subtle embellishments. Hand embroidery techniques like using beads, metallic threads, or sequin accents can add texture and sparkle without sacrificing the rhythm of weekend sessions. This approach supports embroidered design ideas that evolve from small experiments into cohesive collections.
Consider creating a small series of hoop art pieces that share a color gradient or theme. Planning ahead helps you build a portfolio for gifts or home decor and reinforces the learning path that blends beginner embroidery projects with more advanced ideas, all while staying within a reasonable weekend schedule.
From Embroidered Design Ideas to a Personal Collection: Planning and Portfolios
Organize your designs into a growing collection by sketching motifs, testing color palettes, and tracking what works in a dedicated notebook or digital folder. This planning phase turns embroidered design ideas into concrete projects you can revisit, display, or gift, aligning with weekend craft projects that respect your pace.
As your confidence grows, use step-by-step embroidery lessons to guide each new piece, expand your toolkit, and curate a personal portfolio of finished works. Your ongoing practice merges practice with purpose, turning every stitch into a step toward a larger, cohesive collection.
Frequently Asked Questions
What is a DIY Embroidered Design and how can it fit into weekend craft projects?
DIY Embroidered Design is a portable, relaxing handcraft that turns fabric into decorative pieces using simple stitches. It fits weekend craft projects because you can complete small pieces in a weekend, guided by beginner-friendly steps and step-by-step embroidery lessons.
Which beginner embroidery projects are ideal for starting a DIY Embroidered Design journey?
Begin with four beginner-friendly projects: hoop art, personalized napkins, denim patches, and an embroidered card or gift tag. These beginner embroidery projects provide quick starts and clear results, making them perfect entry points for a DIY Embroidered Design.
How do step-by-step embroidery lessons help you master a DIY Embroidered Design?
Step-by-step embroidery lessons break learning into small, manageable tasks, building confidence as you master foundational stitches like backstitch and satin stitch. They help you progress from simple designs to more complex embroidered design ideas you can finish in a weekend.
What are some embroidered design ideas for a first DIY Embroidered Design project?
Start with high-contrast motifs such as a simple floral, heart, or geometric shapes. These embroidered design ideas are easy to transfer and stitch, teaching essential texture and color planning for future projects.
What hand embroidery techniques are essential when practicing DIY Embroidered Design?
Key hand embroidery techniques include backstitch for outlines, satin stitch for color blocks, running stitch for delicate lines, and French knots for texture. Mastering these techniques provides a solid toolkit for most DIY Embroidered Design projects.
How can you plan a small DIY Embroidered Design portfolio as a weekend crafter?
Keep a simple notebook or digital log of projects, notes on stitches and colors, and a gallery of mini hoop art. This approach supports weekend craft projects, helps you track progress with step-by-step embroidery lessons, and grows your DIY Embroidered Design portfolio.
| Section | Key Points |
|---|---|
| Introduction | DIY Embroidered Design is a portable, relaxing, and endlessly customizable craft that fits weekend schedules. It offers an entry point for beginners, guiding you from simple starter projects to step-by-step lessons that build confidence and skill. It’s suitable for wall art, gifts, or sprucing up clothing, turning fabric, thread, and patience into finished pieces with practical tips. |
| Understanding the appeal | Stitches count in a flexible, weekend-friendly pace. You can start and stop as time allows, focusing on progress over perfection, with a few core stitches (backstitch, satin stitch, French knot) delivering impressive results. |
| Mindset & toolkit | DIY Embroidered Design becomes a toolkit: learn to sketch designs, choose colors, and adapt stitches to fit fabric. This promotes experimentation and personal style, with projects designed to encourage exploration. |
| Key materials and setup | Beginner-friendly essentials: fabric (stable cotton/linen), embroidery hoop (6-inch standard, 8–9-inch optional), needles (size 7–9), threads (4–6 colors), transfer tools (water-soluble pen/graphite), scissors, measuring tape, and a thimble. |
| Project ideas | Four weekend-friendly projects: Hoop Art, Personalized Napkins/Hand Towels, Denim Patch Patches, and Embroidered Card/Gift Tag, each with simple stitches and practical tips to complete within a weekend. |
| Techniques & practice | Foundational techniques (tension, fabric choice, backstitch, satin stitch, running stitch, French knots) and finishing touches (washing, ironing, framing) to build a reliable practice. |
| Learning path | Practice regularly, track progress, keep notes, and build a digital or paper library of embroidered design ideas to guide future projects. |
| Advanced tips | Add complexity with motifs, try different fabrics, incorporate embellishments, and create small series to expand your portfolio. |