
Free-motion embroidery opens up a world of texture and movement, turning your sewing machine into a flexible drawing tool. Unlike fixed-path machine embroidery, it lets you guide the needle and fabric to craft texture embroidery that feels hand-stitched. From mastering free-motion embroidery techniques to selecting the right machine embroidery design approach, you’ll want stabilizers for free-motion to keep stitches clean and add stitch patterns for depth. With practice, you can layer lines, leaves, and curves to build dimensional surfaces across garments, quilts, and home decor. This introductory guide highlights essential tools, setup, and tips to help you start adding rich texture and depth.
In other terms, this approach is open-path stitching that lets fabric glide under a specialized foot as you guide the needle. It centers on dynamic surface embellishment, where texture is built through motion, layered passes, and varied thread density rather than fixed motifs. LSI-friendly terms you might encounter include open-ended stitching, freehand machine stitching, and decorative stitching that delivers depth and tactility to garments, quilts, or decor projects. Using stabilizers for free-motion and mindful tension, you can translate design ideas into dimensional fabric surfaces.
Understanding Free-Motion Embroidery: Techniques, Tools, and Texture
Free-motion embroidery turns a standard sewing machine into a flexible drawing tool, enabling curved lines, irregular shapes, and texture-rich surfaces that read as texture embroidery. By guiding the needle and fabric by hand, you can achieve organic motion and dimensionality that flat stitching cannot.
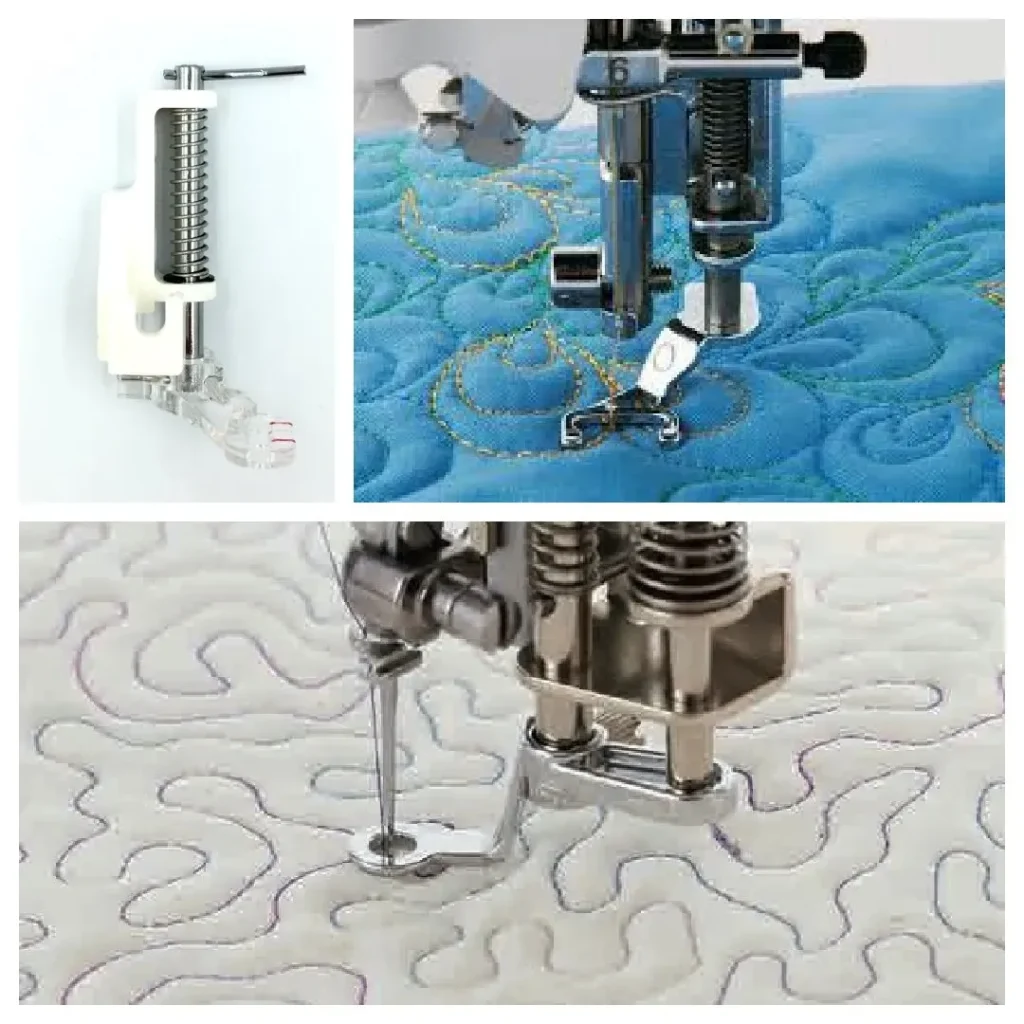
To get started, set up your machine for free-motion use: lower the feed dogs, attach a free-motion presser foot, and choose a straight or decorative stitch at a comfortable speed. With practice, you’ll master core free-motion techniques like layering stitches and echo stitching, which build depth and texture in your work.
Free-Motion Embroidery Techniques to Build Texture
Texture is the heartbeat of this technique. Varying thread types, densities, and stitch lengths creates tactile surfaces that catch light and invite close inspection. The choice of threads—rayon, polyester, or cotton—will influence sheen, body, and how the surface reads from a distance.
Core free-motion embroidery techniques include layering stitches, echo stitching, curved lines, and color blending. These approaches let you construct dimensional surfaces, where shadows and highlights emerge from deliberate passes and directional changes, giving your piece a lively sense of texture embroidery.
Stabilizers for Free-Motion: Choosing the Right Support for Every Fabric
Stabilizers are the quiet heroes of free-motion stitching. For woven fabrics, tear-away stabilizers provide support without excessive bulk; for knits and stretch fabrics, cut-away stabilizers offer enduring reinforcement; for delicate textures, wash-away or water-soluble options can preserve intricate details.
Choosing the right stabilizer depends on fabric weight, planned texture layers, and how much motion you expect as you stitch. Testing on a swatch helps you dial in tension, grip, and overall stabilization to keep puckering and distortion at bay.
Stitch Patterns for Depth: Layering and Echoing to Create Dimension
Depth in free-motion work comes from deliberate stitch patterns for depth: layering long and short stitches, dense satin fills, and offset echo passes to simulate shading. By varying density and direction, you coax the eye to perceive form and volume.
Experiment with color shifts and thread blends to further enhance dimensionality. Subtle transitions between hues and controlled density changes help your surface read as three-dimensional, turning ordinary fabric into a tactile landscape.
Designing for Free-Motion Embroidery: From Concept to Machine Embroidery Design
Designing for this technique starts with a simple motif and a plan for highlights and shadows. Sketch ideas on paper and then translate them onto fabric with a light fabric pen, outlining where texture will live.
The project evolves into a machine embroidery design that blends texture embroidery, layered stitches, and thoughtful color choices. Testing on a swatch ensures your concept translates into texture and depth before committing to the final piece.
Setup, Practice, and Troubleshooting for Free-Motion Embroidery
Efficient setup and practice are essential. Ensure your machine is threaded correctly, attach the free-motion foot, and practice on a scrap to learn how the fabric moves under your guidance.
Common issues like puckering, uneven stitches, thread breaks, or fabric shifting can be addressed with the right stabilizers for free-motion, proper tension adjustments, and careful planning. Keeping notes on what worked—thread type, stabilizer choice, and stitch density—will speed up progress on future projects.
Frequently Asked Questions
What is free-motion embroidery and how does it relate to texture embroidery and machine embroidery design?
Free-motion embroidery is a technique that lets you guide the needle and fabric to create curved lines and layered textures, giving texture embroidery a three-dimensional feel. Unlike traditional machine embroidery design, it follows your path rather than a fixed pattern, offering greater freedom and depth.
Which stabilizers for free-motion should I use for different fabrics and textures?
Choose stabilizers based on fabric type: tear-away for woven fabrics to prevent puckering, cut-away for knits and stretch fabrics for support, and water-soluble or wash-away for delicate textures. Pair the stabilizer with proper tension and a free-motion foot to keep fibers stable and reduce distortion.
What stitch patterns for depth can I achieve with free-motion embroidery techniques?
Try layering stitches, echo stitching, varying stitch length, and dense satin fills to build depth. Curved lines and direction changes help shading, while color shifts enhance texture and dimensionality.
How do I set up my machine for free-motion embroidery to maximize texture embroidery results?
Set up by enabling a free-motion or darning setting, lowering the feed dogs, and using a free-motion presser foot. Use stabilizers for free-motion appropriate to your fabric, select threads and needles suited to your material, and practice on a swatch to dial in tension and speed.
What are common mistakes in free-motion embroidery and how can stabilizers for free-motion and stitch patterns for depth help?
Common issues include fabric puckering, uneven stitches, and thread breakage. Pair stabilizers for free-motion with slower speeds, then use stitch patterns for depth—layering and echoing—to build consistent texture. Re-test on swatches to refine tension.
How can I design projects using free-motion embroidery to create texture and depth?
Start with a focal shape and sketch a plan for highlights and shadows. Use texture-focused stitch patterns for depth, plan color shifts, and test on a swatch with stabilizers for free-motion before committing to the final piece.
| Aspect | Key Points |
|---|---|
| What is Free-motion embroidery? | Technique that lets you move fabric under the needle to draw paths, creating curved shapes and layered textures; you control stitch path, speed, and density. |
| Tools & Setup | Machine with free-motion setting, free-motion presser foot, stabilizers, threads, needles; lower feed dogs, set straight or decorative stitch, and practice on swatches. |
| Techniques for Texture & Depth | Layering stitches; echo stitching; varying stitch length; dense satin/fill stitches; curved lines; stitch direction changes; color shifts for depth. |
| Design Considerations | Start simple; plan highlights and shadows; use negative space; test on swatches; choose focal shapes and plan color/threads. |
| Stabilizers & Tension | Stabilizers: tear-away for woven, cut-away for knits, or wash-away. Use slightly looser upper tension; adjust as you test. |
| Projects & Applications | Embellished garments, home decor, quilting accents, art panels; use texture and depth to create movement and light-catching surfaces. |
| Practice & Progress | Practice with small motifs and limited colors; record what works; gradually expand to complex textures. |
| Common Mistakes & Fixes | Puckering: use appropriate stabilizers; uneven stitches: maintain steady speed and movement; thread bunching: check path and re-thread; holes/gaps: add passes or denser stitches. |
Summary
Free-motion embroidery opens a world of texture and depth in fabrics, inviting you to guide the needle and fabric to create unique surface details. As you design a motif, consider how stabilizers, threads, and stitch choices co-create shading and dimension. Layering stitches, echoing shapes, and varying stitch lengths bring surfaces to life, whether on garments, quilts, or home decor. With practice, your machine becomes a flexible drawing tool that transforms plain fabric into tactile art. Start with small swatches, test different stabilizers and threads, and gradually build complex textures that read as three-dimensional.