
Remove and Restore Fabric with Patches begins with a simple truth: careful technique can revive worn fabrics while preserving their story. In this practical, step-by-step guide, you’ll learn how to remove fabric patches if needed and restore the fabric for a cohesive look. Whether you’re repairing a denim jacket, a cotton shirt, or a knit sweater, the methods here are designed to support mending fabric with patches while keeping the base intact. Think of this as your go-to fabric patch repair tutorial that also doubles as a step-by-step patch repair guide. By the end, you’ll know how to remove patches without weakening the base fabric and how to approach restoring fabric after patch for a clean, durable finish.
Beyond the basics, this topic maps to broader garment care and fabric rehabilitation that emphasize longevity and sustainable style. From an SEO perspective, keywords and related terms—such as patch removal techniques, fabric surface restoration after appliqué, and durable textile mending—help connect the article to related searches. The goal is to give readers clear, actionable guidance on when to patch, when to remove, and how to balance repairs with the garment’s original look and texture.
Understanding When to Remove Patches and Restore Fabric
Patches can extend the life of a garment, but there are times when removing one is the smarter choice. Consider a patch that is damaged, overly worn, or simply not your style any longer. In some cases, the patch may obscure a stain you want to treat, or it could interfere with cleaning or sewing on a new patch. The goal is not just to pull off fabric; it’s to restore the underlying material so it looks as good as possible for further repair or a clean, patch-free finish.
From a technical standpoint, removing a patch is a controlled process that minimizes stress on the fabric. This is especially true for delicate materials like silk blends or knits, where aggressive tugging can create runs or holes. When done correctly, you’ll achieve a clean surface ready for restoration or for applying a fresh patch as part of a long-term mending plan and the broader fabric patch repair tutorial mindset.
Remove and Restore Fabric with Patches: Tools, Preparation, and Best Practices
As part of a comprehensive fabric repair strategy, gather a reliable toolkit before you begin Remove and Restore Fabric with Patches. Essential tools include a fine-tiber seam ripper or micro-edged scissors for close work around the patch, sharp fabric scissors for trimming threads, tailor’s chalk or a fabric marker for alignment, clean tweezers for lifting threads, matching thread and needle for touch-up stitching, and optional patch adhesive if you’re securing a new patch without sewing. An iron or pressing cloth helps flatten and set the fabric after removal, while mild sewing machine thread and a needle provide reinforcement if needed.
With the right gear, you can execute a careful, step-by-step patch repair approach that minimizes damage and preserves the garment’s original character. Remember to test any glue or solvent on a hidden area first and prepare a clean workspace so you can proceed with patience. This preparation aligns with the fabric patch repair tutorial mindset and supports clean, durable restoration after patch removal.
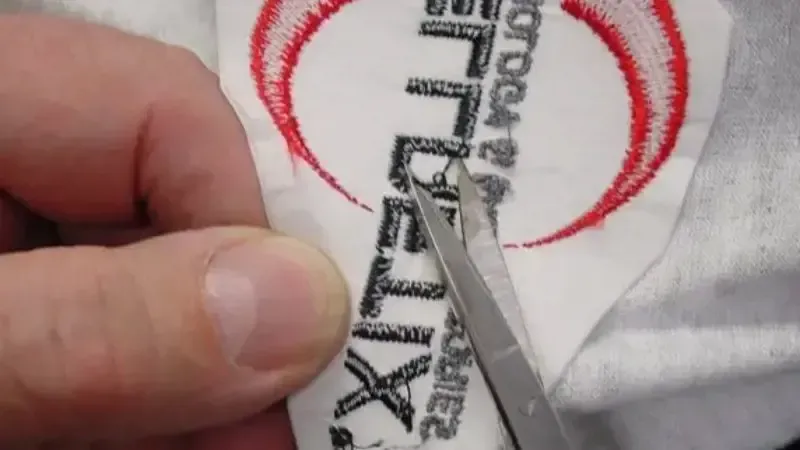
Step-by-Step: How to Remove Fabric Patches Without Damaging the Base Fabric
Step 1 – Inspect the patch and base fabric to understand how it’s attached and whether the fabric beneath shows wear. Assess if the patch is sewn around the edges, embedded in a design, or glued. This assessment informs your removal approach and helps you avoid creating new damage, which is essential for a successful restoration after patch removal.
Step 2 – Mark a removal outline if needed. Step 3 – Begin with the seam edges using a seam ripper to carefully cut or release stitches along the patch’s perimeter. Work slowly and in small increments, pulling threads away from the fabric rather than toward it. If the patch is tightly sewn, create small gaps and switch to tweezers to lift strands, following a careful, methodical path common to any good how to remove fabric patches guide.
Step-by-Step: How to Restore Fabric After Patch Removal
Step 1 – Assess the fabric surface after removal. Look for thinning, snagging, or residual adhesive. If the area is significantly damaged, you may need to reinforce from the inside or plan a larger repair. This assessment sets the stage for deciding whether to aim for a seamless finish or to prepare for a new patch.
Step 2 – Decide on your restoration path and Step 3 – Stabilize the fabric with a thin interfacing or stabilizer if needed. Step 4 – Prepare the surface for patching if you plan to re-patch, selecting a color and fabric that matches the surrounding material and finishing the edges to prevent fraying. Step 5 – Secure a new patch or repair, sewing around the edges or using a patch adhesive, and Step 6 – Blend textures and colors with matching thread and mindful stitches to create a natural look. Step 7 – Final pressing and finishing touches to ensure good drape and texture.
Practical tips for success and avoiding common mistakes
Tip 1 – Work in good lighting to clearly see seam lines, alignment, and fabric texture. Tip 2 – Go slow; rushing can lead to tears or accidental cuts. A methodical approach yields tidier results and aligns with the broader practice of mending fabric with patches.
Tip 3 – Test glue or solvent on a small hidden area before committing, and preserve the garment’s story by documenting the process if the patch has sentimental value. Aftercare is crucial: wash gently and either air-dry or use a delicate cycle to protect the restored area, ensuring longevity for future repairs.
Real-world Scenarios: How Patch Removal and Restoration Apply to Denim, Cotton, and Knit Fabrics
Denim jackets with removable patches often reveal fraying at the edges after removal. A light edge repair paired with a fresh patch can create a durable, polished look that keeps the jacket’s rugged character intact. This scenario highlights how a thoughtful approach to removing patches and restoring fabric supports a durable, patch-based wardrobe.
For a cotton shirt with a decorative patch, delicate fabrics may benefit from a patchless restoration that preserves texture, followed by careful pressing to restore smoothness. A knit sweater with an embroidered patch requires extra care to avoid laddering; stabilizers can help you remove the patch without weakening knit loops, illustrating how different fabrics demand nuanced, step-by-step patch repair and mending techniques.
Frequently Asked Questions
What is Remove and Restore Fabric with Patches, and when should you use this approach?
Remove and Restore Fabric with Patches is a practical method to remove existing patches when needed and restore the underlying fabric to look cohesive, enabling a fresh patch or a clean patch-free finish. This approach aligns with a fabric patch repair tutorial and is part of the broader practice of mending fabric with patches, step-by-step patch repair, and careful restoration.
What tools are essential for Remove and Restore Fabric with Patches?
Essential tools for Remove and Restore Fabric with Patches include a fine seam ripper or micro-edged scissors, sharp fabric scissors, tailor’s chalk or fabric marker, clean tweezers, matching thread and needle, optional patch adhesive, an iron with a pressing cloth, and mild sewing machine thread for reinforcement. Having these tools supports a smooth fabric patch repair tutorial and the overall step-by-step patch repair process.
How do you remove fabric patches without damaging the base fabric in Remove and Restore Fabric with Patches?
Start by inspecting the patch and base fabric, then lightly mark the removal outline if needed. Gently release stitches along the patch perimeter with a seam ripper, working in small increments and pulling threads away from the fabric. For adhesive patches, peel carefully, use a warm iron or solvent as directed, and finish by trimming residue and pressing the surface to restore shape.
How do you restore fabric after patch removal in Remove and Restore Fabric with Patches?
First assess the fabric surface for thinning or residue. Decide whether you want a seamless finish or to apply a new patch. Stabilize fragile areas with a thin interfacing, prepare the surface for patching if needed, and then secure a new patch or repair with careful stitching or adhesive. Finally, blend textures with appropriate thread color and complete a final press to restore drape.
What practical tips help ensure success with Remove and Restore Fabric with Patches?
Work in good lighting, go slowly, and test any glue or solvent on a hidden area first. Preserve the garment’s intent by documenting the process if the patch has sentimental value, and follow gentle care after repair to maintain the restored surface. These tips are part of a reliable fabric patch repair tutorial mindset.
Can you re-patch or achieve a seamless finish after Remove and Restore Fabric with Patches?
Yes. After removing patches, you can re-patch by selecting a color and fabric that matches the surrounding material, using a nearly invisible stitch, or opting for patch adhesive for a non-sewn option. For a seamless finish, align the new patch carefully, blend textures and colors, and perform a final pressing as part of the step-by-step patch repair process.
| Key Point | Description |
|---|---|
| Purpose of the guide | Introduces Remove and Restore Fabric with Patches and offers a practical, step-by-step method to remove patches if needed and restore the fabric so it looks cohesive, ready for a new patch, repair, or a clean finish. |
| When to remove patches | Patches can extend a garment’s life, but they may be damaged, overly worn, no longer preferred, or interfere with cleaning or re-patching. The aim is to restore the underlying fabric to look as good as possible. |
| Essential tools and materials | Seam ripper or micro-edged scissors, sharp fabric scissors, tailor’s chalk or fabric marker, clean tweezers, matching thread and needle, optional patch adhesive, iron or pressing cloth, and mild sewing machine thread and needle for reinforcement. |
| Removal: key steps | Inspect the patch and base fabric; mark an outline if needed; carefully release stitches along the patch edge; work along seams if required; gently remove adhesive patches with heat/solvent as directed; trim residue, trim loose threads, then press and inspect the surface. |
| Restoration: key steps | Assess the exposed fabric; decide on a restoration path (seamless look or re-patching); stabilize fragile areas; prepare the surface for patching if applicable; secure a new patch or repair and blend textures/colors; final pressing and finishing touches. |
| Practical tips | Work in good lighting; go slowly; test glues/solvents on a hidden area first; preserve the garment’s intent by documenting the process if needed; care for the fabric after repair with gentle washing and air drying. |
| Real-world scenarios | Denim jacket with a removable patch may reveal edge fraying that can be lightly repaired; cotton shirt may benefit from a patchless restoration for texture; knit sweater requires extra care with stabilizers to prevent laddering. These examples illustrate fabric-type considerations during removal and restoration. |
Summary
Remove and Restore Fabric with Patches is a practical, repeatable approach to fabric care that respects a garment’s history while extending its life. By understanding when to remove patches, gathering the right tools, and following careful, step-by-step methods for both removal and restoration, you can extend the life of many fabrics without compromising style. This process aligns with broader goals of fabric repair tutorials and mending practices—preserving value, reducing waste, and enjoying the craft of sewing and garment care. Whether you’re repairing a cherished heirloom or updating a modern piece, the right technique yields results that look intentional, well-executed, and durable for everyday wear.