
DIY fashion patches have exploded in popularity as a simple, affordable way to customize clothing and express personal style, from thrifted finds to brand-new basics, giving you a quick, creative upgrade without professional help. This guide explains why these patches are trending and how they fit into the broader upcycling fashion patches movement, with ideas to refresh denim jackets, backpacks, and more, while keeping style affordable and sustainable. If you’re wondering how to apply patches to clothing, this article walks you through the practical steps and even includes an iron-on patches tutorial for quick updates, along with tips on choosing fabrics that hold up to heat. We cover patch types—from iron-ons to sew-ons—plus placement, color coordination, and care tips to keep patches vibrant on items like patches for denim jeans, jackets, bags, and even hats, so you can craft a complete look. Whether your goal is a bold statement or a cohesive, subtle detail, patches empower personal expression and affordable transformation of your wardrobe while encouraging experimentation, color play, and mindful recycling of old garments.
Think of these embellishments as textile graffiti you can sew or fuse onto garments, turning a plain tee into a statement piece. Fabric badges, sewn-on accents, and decorative embroidery patches serve as interchangeable details that let your wardrobe tell a story. This approach aligns with sustainable fashion by reviving old items, customizing accessories, and encouraging mindful consumer habits. Whether you call them patches, badges, appliqués, or emblems, the idea remains the same: you create texture, color, and personality through carefully placed pieces. By pairing different types of attachments—iron-on, sew-on, or removable back designs—you can experiment with looks without permanent changes, supporting flexible, on-demand style.
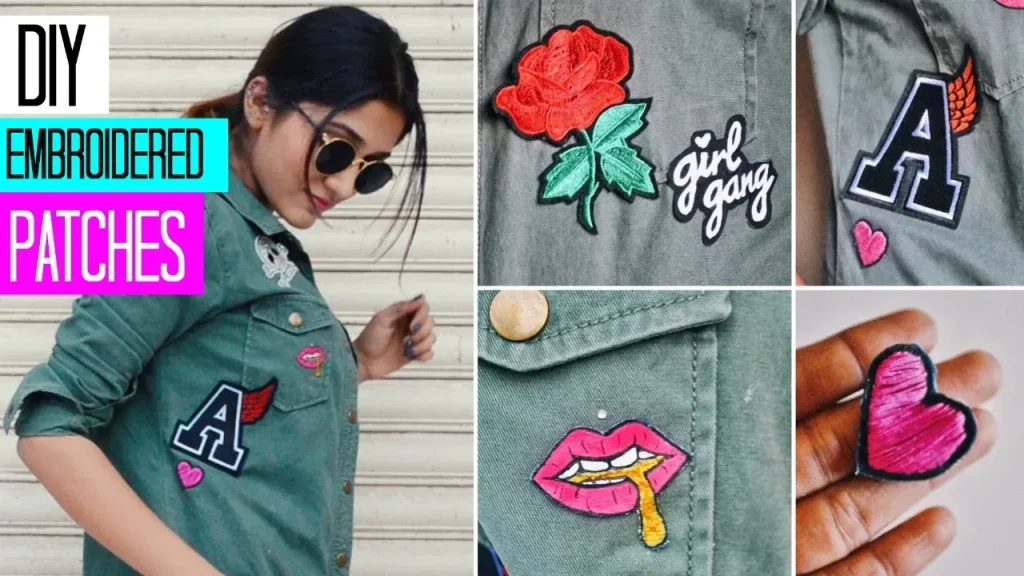
Why DIY fashion patches are redefining everyday style
DIY fashion patches are redefining how people express personality through clothing. They offer an accessible route to customize jackets, bags, and tees without needing a professional studio. By mixing motifs, colors, and textures, you can craft a wearable story that feels uniquely yours. The DIY fashion patches movement blends nostalgia with contemporary aesthetics, turning old garments into statement pieces.
This approach aligns with the larger upcycling trend, encouraging longer garment life and reduced waste. Personalization is the core driver: you can showcase travel memories, favorite bands, or witty quotes through carefully chosen patches. With a little planning, patches become a small but powerful design language that adapts as your style evolves.
Choosing the right patches for denim jeans and other fabrics
When selecting patches, consider both fabric compatibility and the impact you want on your silhouette. Patches for denim jeans perform best with sturdy backing and medium-to-large motifs that balance the garment’s lines. For lighter fabrics like canvas or knitwear, choose smaller patches and flexible backings to prevent sagging or puckering.
Evaluate patch types—iron-on, sew-on, and embroidered options—and think about how washable the item will be. Iron-ons are great for denim’s dense weave, while sew-on patches may outlast frequent washing. Color palettes and patch sizes should complement the base garment rather than overwhelm it.
Iron-on vs sew-on patches: choosing the best method for your project
Iron-on patches are a popular first choice for quick updates. They fuse with heat-activated backing, offering a fast path to visibility on jackets, jeans, and backpacks.
Sew-on patches, by comparison, rely on stitching to endure frequent wear and laundering. For pieces that endure regular washing or heavy use, sew-on patches or a reinforced border provide extra durability. If you’re curious about a guided approach, an iron-on patches tutorial can walk you through heating, cooling, and edge sealing steps.
Step-by-step guide to applying patches at home
Whether you choose iron-on or sew-on patches, following a clear process helps you achieve durable results. This section outlines practical steps for applying patches to clothing in a home setting, and can be followed by anyone with basic tools.
Start with clean, wrinkle-free fabric, position your patch carefully, and secure it with heat or stitching. For iron-ons, use a pressing cloth, appropriate heat setting, and a steady hand to ensure full adhesion. For sew-ons, align stitch lines, use pins, and finish with a secure knot or backstitch.
After finishing, inspect edges, let the fabric cool, and wash gently after a day to let any adhesives cure. You can reinforce patches with a tight zigzag stitch for extra longevity.
Creative placement ideas to elevate your patched wardrobe
Placement choices shape the narrative of your patched wardrobe. A bold back panel on a denim jacket or a row of patches along the sleeves can create a striking story without crowding the garment.
Mixing sizes, themes, and textures helps tell a patch story. Consider a gradient of patches from large to small, or a themed collage that echoes a color family. This approach aligns with upcycling fashion patches by reusing remnants into a cohesive design, turning leftover fabric into wearable art.
Care, maintenance, and longevity for patched garments
Patched pieces deserve careful maintenance to stay vibrant. Turn garments inside out, choose cold water cycles, and avoid high-heat drying that can loosen patches.
Regularly inspect patches for loose edges and reattach as needed. Choose compatible fabrics and patch types to maximize longevity, and consider edge sealing with fabric glue if you notice fraying. For denim, routine checks ensure colorfastness and resilience on heavy-wear areas.
Frequently Asked Questions
What are DIY fashion patches and why are they trending?
DIY fashion patches are decorative fabric motifs you attach to clothing to personalize your look. They are trending because they are affordable, enable upcycling, and let you tell your story with minimal sewing. Patches work on denim, canvas, leather, knitwear, and accessories, making it easy to refresh jackets, bags, or hats with a few well-chosen patches.
How to apply patches to clothing using iron-on patches: is there an iron-on patches tutorial I can follow?
To apply patches to clothing with iron-on patches, start with a clean, dry garment. Position the patch, cover with a thin cloth, and press with a hot iron for 15–20 seconds, applying steady pressure. Let cool and test adhesion. For extra durability, sew around the edge with a tight zigzag stitch.
What patches work best on denim jeans for DIY fashion patches?
Denim jeans are a durable canvas for patches. Choose patches for denim jeans with varied colors and textures. Place large patches on the back panel or front legs and smaller ones on pockets or cuffs. For longevity, combine iron-on and sew-on patches and wash inside out to protect them.
How do I choose patches for upcycling fashion patches to create a cohesive look?
For an upcycling fashion patches look, start with a theme or color story and select patches that fit. Mix patch types (embroidered, woven, iron-on) and vary sizes to create movement. Cluster patches on a back panel or sleeves to tell a cohesive story without crowding the garment.
Where should I place patches on jackets, jeans, or bags to maximize impact with DIY fashion patches?
Placement matters. Try clustering patches on the back of a jacket, along the sleeves, or across jeans pockets for impact. On bags, create a focal row or circle. Keep a consistent scale and color palette to achieve a cohesive, stylish result with DIY fashion patches.
How should I care for patched garments to keep DIY fashion patches looking vibrant?
Care for patched garments by turning them inside out and washing on a gentle cold cycle. Air-dry when possible and avoid high heat, which can loosen adhesives. Regularly inspect edges and re-sew or re-adhere as needed to keep DIY fashion patches looking vibrant for years.
| Topic | Key Points |
|---|---|
| Why patches are trending |
|
| Types of patches you can use |
|
| How to choose patches that fit your wardrobe |
|
| Placement ideas that elevate your look |
|
| Getting the basics right: tools and materials |
|
| Step-by-step guide: applying iron-on patches (the fast, beginner-friendly method) |
|
| Step-by-step guide: sew-on patches (durable and versatile) |
|
| Care and maintenance for patched garments |
|
| Creative ideas and design ideas to spark your patch journey |
|
| Patches for denim jeans: a versatile canvas |
|
| Patch care for longevity and color retention |
|
Summary
DIY fashion patches empower you to express a unique personal style while embracing upcycling and affordability. This guide explains why patches are trending, the patch types you can use, how to choose and place patches, essential tools, and step-by-step methods for applying iron-on and sew-on patches. It also covers care, longevity, and creative ideas to build a cohesive wardrobe. By following these practices, you can transform ordinary garments into a personalized canvas that reflects your taste and sustainable mindset.