
Eye-catching Custom Patches grab attention and transform garments into portable branding stories. They serve as storytelling devices and durable accents that fans want to wear or collect. When designed with a clear silhouette, balanced color, and thoughtful texture, patches elevate apparel, bags, and hats. This guide blends core design principles, color theory, and production considerations to help designers and brands craft patches that stand out. From defining a bold concept to selecting a compact color palette, the right patch design can boost recognition and loyalty.
In broader terms, these badges read as wearable branding signals—the language of a logo translated into fabric, stitching, and texture. For teams refining their approach, the idea of custom patch design comes into play as you balance legibility, silhouette, and brand palette while accounting for production realities. Practical patch design tips include selecting a bold silhouette, testing size variations, and ensuring strong contrast so the badge reads clearly from a distance. When embroidery is the chosen method, embroidery patch design tips help tune stitch density, edge definition, and color blocking to preserve durability on clothing. If you’re new to the process, learning how to design patches for clothing translates identity into durable, color-conscious accents and is guided by patch color theory. Think of patches as scalable branding assets, from small shirt embroidery to larger shoulder patches, that communicate values without shouting. Consider typography carefully, ensuring it complements the icon and remains legible at multiple sizes. Color considerations extend beyond the patch itself, as the garment color, lighting, and wear over time affect perceived contrast. A thoughtful production plan—ranging from vector art to prototype samples—helps you catch issues early and iterate efficiently.
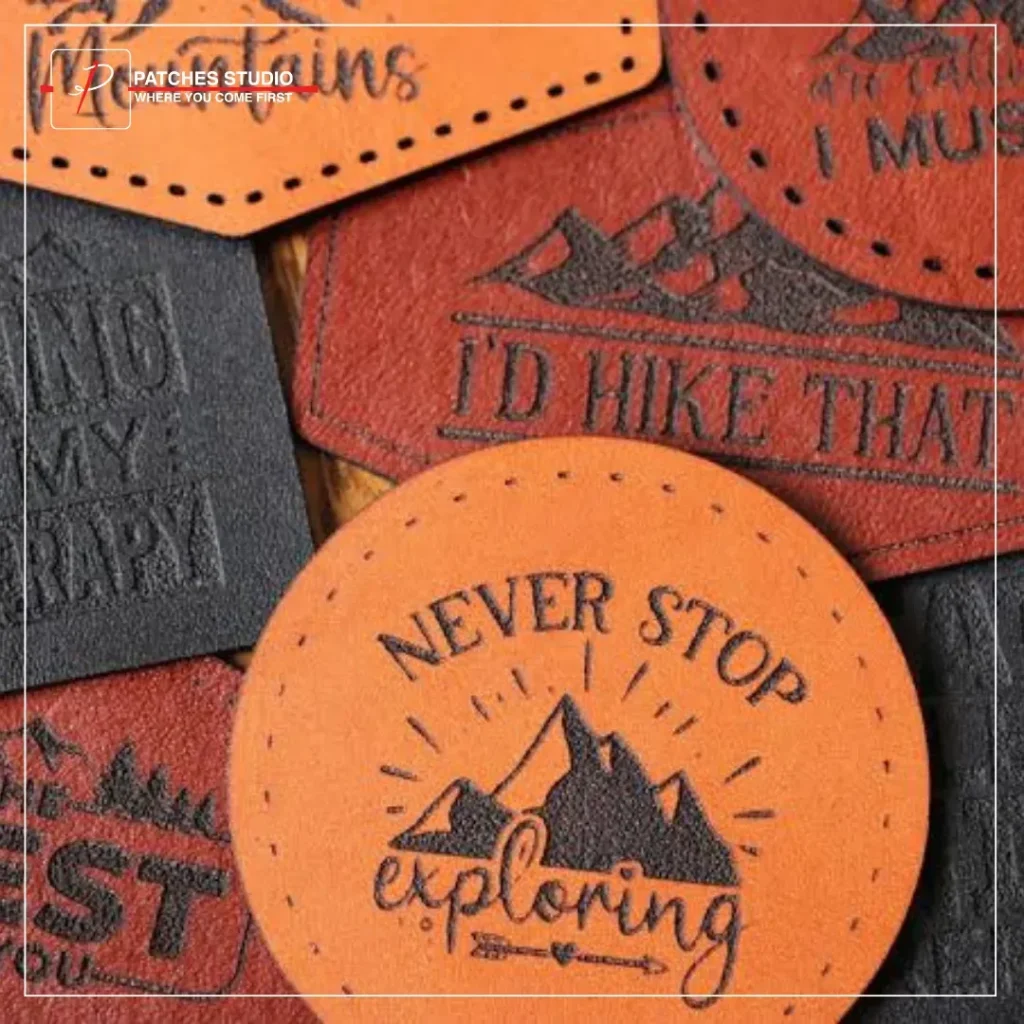
Eye-catching Custom Patches: Concept-to-Silhouette for Maximum Readability
Start with a strong concept and a bold silhouette to anchor your patch design. In the realm of custom patch design, the core idea should be instantly readable, especially when the patch will appear on clothing or accessories at small sizes. This approach aligns with how to design patches for clothing, focusing on clarity, storytelling, and brand resonance.
Sketch a few bold silhouettes and test their legibility from a distance; a clean outline and minimal internal detail often outperform complex linework on 1-2 inch patches. This aligns with patch design tips that emphasize readability, strong focal points, and consistent edge finishing to preserve impact through wear and washing.
Shape, Size, and Negative Space: Crafting Readable Patch Designs
Shape drives first impressions. Traditional forms like circles and shields read quickly, but custom geometry can strengthen a unique identity if the overall form remains legible. When practicing patch design tips, test multiple scales to ensure the silhouette remains cohesive from tiny to moderately large sizes.
Negative space is not empty—it’s a design tool. Use breathing room around the central motif to guide the eye and prevent clutter. Ensuring a strong focal point and balanced composition helps maintain readability and enhances the patch’s visual impact.
Color Theory and Thread Selection: Choosing Palettes that Pop on Fabric
Color theory guides mood, contrast, and legibility. Choosing a limited palette that aligns with brand and garment color makes the patch pop without overwhelming the eye. Patch color theory suggests 2-4 core thread colors plus a neutral backdrop, with careful attention to how metallic or matte threads read under different lighting.
Test color combinations on fabric swatches and account for variations in thread shade versus digital color. This practical approach is a core part of embroidery patch design tips, helping you avoid color bleed and ensure durable visibility across wash cycles.
Typography and Imagery: Balancing Text with Iconography on Patches
Typography and imagery must balance presence and clarity. For small patches, limit text to brief slogans or initials and pair typography with a strong icon to reinforce the theme. This mirrors patch design tips that favor legibility over sheer density and is crucial in how to design patches for clothing.
Experiment with font weight, letter spacing, and contrast against patch background. White or black type on contrasting colors tends to yield the strongest legibility, while avoiding overly decorative fonts that can hinder recognition.
Materials, Finishes, and Durability: How Backing and Texture Change Patch Outcomes
Material choice shapes texture, durability, and how fine details render. Embroidery offers bold silhouettes with sturdy color blocks, while woven patches capture fine lines; PVC achieves weather resistance for outdoor gear. Each option influences stitch density, line weight, and coverage, guiding embroidery patch design tips that prevent fraying and bleeding.
Backing and finish matter for longevity. Iron-on options require heat transfer considerations, and fabric backing stability prevents puckering on dark fabrics. Thoughtful material planning supports durability and keeps the design looking crisp after washing.
From Concept to Production-Ready Art: A Production Workflow for Patches
From concept to production-ready art, use vector-based workflows to preserve sharp edges at any scale. Define stitch types (fill, satin, running stitches) and set stitch counts to retain texture without bulk. This is a core part of how to design patches for clothing and aligns with custom patch design practices.
Prepare color separations, provide die-lines, and build garment mockups to preview placement and scale. Run a sample to verify thread colors, backing compatibility, and overall finish before mass production, ensuring the final patch meets brand standards and customer expectations.
Frequently Asked Questions
How can Eye-catching Custom Patches be designed using solid custom patch design principles to maximize visibility on garments?
Begin with a strong concept and a bold silhouette. Favor simple shapes and ensure legibility at small sizes (1-2 inches). This focus on clear outlines and minimal detail is key for Eye-catching Custom Patches that read from a distance and reinforce branding.
What patch color theory strategies should I apply when designing Eye-catching Custom Patches for different fabric colors?
Use a limited color palette (2-4 core thread colors) with high contrast against both the patch base and the garment. Test combinations on fabric swatches and note that thread shades can differ from digital previews. Applying patch color theory thoughtfully helps Eye-catching Custom Patches pop in real lighting.
What embroidery patch design tips help Eye-catching Custom Patches maintain legibility and durability at small sizes?
Avoid extremely fine lines and intricate details that won’t stitch cleanly. Increase outline thickness for durability and set appropriate stitch density. Create color separations and test patches on actual garments to ensure legibility in real wear. These embroidery patch design tips support longevity.
For beginners, how to design patches for clothing to achieve Eye-catching Custom Patches that communicate a clear concept?
Start with a clear concept and readable silhouette. Sketch bold shapes, then move to production-ready vector art with defined stitch types and color references. Build garment mockups, convert text to outlines, and run a sample to verify scale and finish before full production.
How do patch design tips influence the balance of typography and imagery in Eye-catching Custom Patches?
Limit text to a single keyword or short phrase and pair it with a strong main icon. Ensure the typography is legible against the patch and garment colors, and adjust type size to read at 1-2 inches. Test on real garments to confirm balance and readability.
What common pitfalls in embroidery patch design tips should be avoided to keep Eye-catching Custom Patches durable across wear and washing?
Too much color or busy details that clutter small patches; inconsistent line weights; outlines that are too thin and may disappear after stitching. Always verify padding, edge finishing, and backing, and run a sample on a garment to confirm durability before mass production.
| Aspect | Key Points |
|---|---|
| Purpose | Eye-catching patches are branding tools, storytelling devices, and accessories that can elevate garments and accessories. |
| Effect | When designed well, patches capture attention, communicate a theme at a glance, and become memorable details fans and customers want to collect or wear. |
| Guide Focus | The guide provides practical, craft-focused insights into creating eye-catching patches with strong visual impact. |
| Integrated Elements | It blends core design principles, color theory, and production considerations to help designers, makers, and brands craft patches that stand out on clothing, bags, and hats while staying durable through wear and washing. |
| Application | Aims to stand out on garments and accessories and endure wear and washing. |