
DIY patch kits unlock practical, affordable ways to mend, decorate, and extend the life of clothing, bags, and fabric-based projects, helping you tackle everyday wear with confidence. Whether you’re repairing a favorite jacket, adding a playful accent to a backpack, or starting a beginner-friendly craft habit, this setup makes the process simple, satisfying, and mess-free for projects both small and ambitious. In this guide, you’ll learn what to look for, including how to choose a patch kit that matches your fabric, and practical steps to sew or apply patches without guessing. From patch kit essentials to brand quality, we cover fabric patch kit compatibility, adhesive types, tools, and a balanced mix of patch sizes for beginners, plus tips on colorfastness and wash care. Whether you’re considering the best patch kits for beginners or comparing iron-on patch kit options, this introduction helps you start right away and build a small, satisfying repertoire of repair and customization.
Seen from a broader angle, these supplies function as fabric repair bundles that combine patches, backing, and heat-activated or sew-on options for practical fixes or decorative embellishment. They’re commonly referred to as fabric repair kits, appliqué sets, or garment embellishment packs, and they cover materials suitable for denim, cotton, canvas, and jersey. By focusing on related terms such as iron-on applications, sew-on options, colorfast patches, and stabilization aids, you capture the full spectrum of what hobbyists and crafters call this kind of product. This branching terminology aligns with how search engines interpret the topic, helping learners discover practical guidance regardless of the label they use.
1) DIY patch kits: Your starter guide to easy repairs and decoration
DIY patch kits offer a practical, mess-free way to mend and decorate fabric items, making repairs approachable for beginners and seasoned crafters alike. By providing patches, backing, and essential tools in one kit, they simplify the process and reduce guesswork, so you can start sewing or ironing with confidence.
This starter guide emphasizes choosing patch kits that align with your project goals and skill level. When you hear “patch kit essentials,” think about fabric compatibility, the right adhesive or backing, and a balanced mix of patch sizes. A well-chosen kit supports both quick fixes and creative embellishments, turning fabric repair into an enjoyable routine.
2) How to choose a patch kit: a practical decision framework
Choosing a patch kit starts with a clear idea of your project. Whether you’re repairing clothing, decorating a bag, or starting a craft project, your goal determines the patch type and adhesive method you’ll use. This framework helps you filter options without overwhelm.
Key steps include assessing fabric compatibility, deciding between iron-on and sew-on approaches, and evaluating included tools. Considering patch kit essentials—like patch sizes, color variety, and backing options—will help ensure you land on a fabric patch kit that matches your needs and budget.
3) Iron-on patch kits vs sew-on patch kits: which suits your fabric
Iron-on patch kits offer speed and beginner-friendliness, using heat-activated adhesives to attach patches. They’re great for casual repairs and decorative accents on sturdy fabrics, but results can vary with delicate materials or high-temperature washing.
Sew-on patch kits prioritize durability, especially after multiple washes. They work well on delicate fabrics where heat is risky, and they give you more control over stitch patterns. Understanding fabric compatibility and care instructions helps you decide whether an iron-on patch kit or a sew-on patch kit is the better fit.
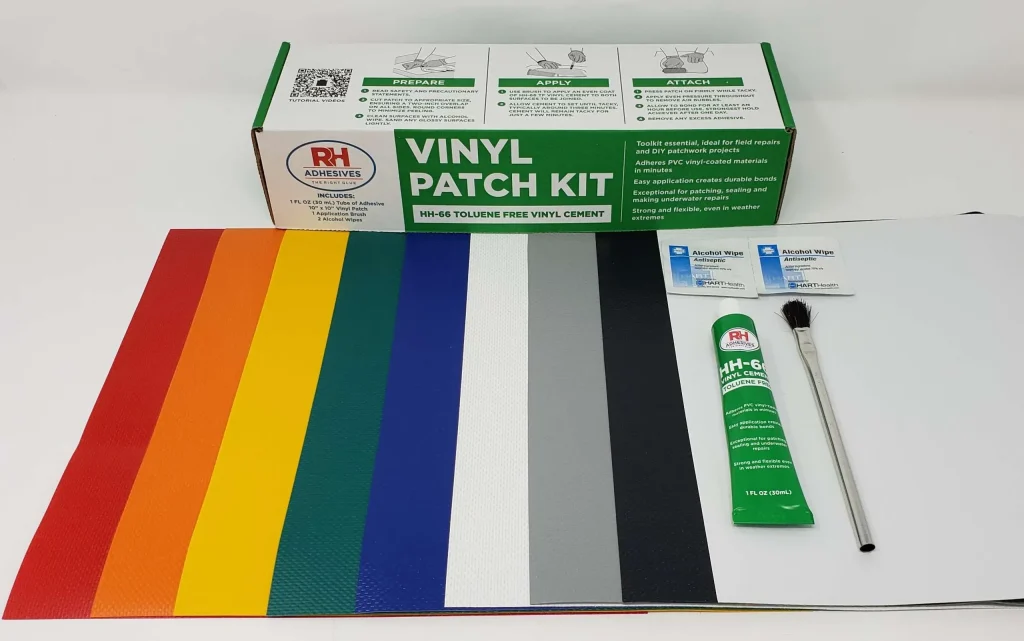
4) Patch kit essentials: what to look for in a quality fabric patch kit
Patch kit essentials include patch material compatibility, adhesive type, and an appropriate mix of patch sizes and shapes. Matching fabrics—denim, cotton, canvas, or twill—with complementary patches improves both durability and visual harmony.
Backings, stabilization, and the quality of tools also matter. A good kit should include reliable scissors, needles, thread colors, and clear instructions. Safety guides, washing care, and reasonable price/value balance make a big difference for beginners seeking reliable results.
5) Best patch kits for beginners: features that speed up learning
The best patch kits for beginners combine clarity, ease of use, and a well-rounded contents list. Look for clear application instructions, a balanced mix of patch sizes, and tools that support quick starts, such as pre-matched thread colors and simple backing materials.
Choosing from top-rated options often centers on accessibility and support—brands with good tutorials, responsive customer service, and durable patches that hold up to washes. A thoughtful selection of patches and easy-to-follow guidance helps new sewists or iron-on enthusiasts gain confidence fast.
6) Creative projects with patches: ideas to try today using a fabric patch kit
Beyond repairs, patches let you personalize bags, jackets, and denim with bold, creative accents. Elbow and knee patches on sweaters or jeans are practical yet stylish, while decorative patches on backpacks and totes turn everyday items into expressive, one-of-a-kind pieces.
Starting with a fabric patch kit, you can plan simple, repeatable projects that build skills over time. By experimenting with patch sizes, colors, and backing types, you’ll develop a flexible approach to patching—whether you’re aiming for quick fixes or push-your-labric creativity—and you’ll gradually master the art of using both iron-on and sew-on patches.
Frequently Asked Questions
What are patch kit essentials for starting with DIY patch kits?
Patch kit essentials are the core items you need to repair or decorate fabric with DIY patch kits. Look for a mix of patches in varying sizes, adhesive or backing options, basic tools (scissors, needles, thread), clear application instructions, and considerations for fabric compatibility. These essentials help you start quickly and with confidence.
What are the best patch kits for beginners when shopping for DIY patch kits?
Look for kits that emphasize ease of use, clear instructions, and a balanced mix of patches. The best patch kits for beginners for DIY patch kits typically include both small and medium patches, simple ironing or sewing options, and essential tools. Reading customer reviews helps verify wash durability and colorfastness.
How to choose a patch kit for DIY patch kits?
Here’s how to choose a patch kit for DIY patch kits: define your project, decide between iron-on vs sew-on, check fabric compatibility, ensure a range of patch sizes, review included tools, and compare price. Following these guidelines helps beginners pick a kit that lasts and adapts to different fabrics.
What is a fabric patch kit and how does it fit into DIY patch kits?
A fabric patch kit is a collection of fabric patches designed for repair or decoration. In the context of DIY patch kits, fabric patch kits offer versatility for clothing, bags, and crafts. Choose patches that match your fabric type and care needs, consider backing options, and follow care instructions to ensure durability.
Are iron-on patch kits a good choice for DIY patch kits and beginners?
Yes—iron-on patch kits are a popular, beginner-friendly option within DIY patch kits because they’re quick and easy. They work best on fabrics that tolerate heat and should follow heat guidelines and care labels. For durability, you may combine iron-on patches with sew-on patches or choose patches with a washable backing.
How should I care for and store DIY patch kits to keep patches and tools in good shape?
Store patches in a dry, cool place to protect adhesives and color, and keep scissors sharp and needles clean. Follow care instructions for washing and ironing on patches, and label contents or create a simple inventory so your patch kit essentials are ready for your next project.
| Topic | Key Points |
|---|---|
| What is a patch kit? | A curated collection of patches, tools, and often adhesives or backing materials designed to fix or embellish fabric items. Contents typically include fabric patches in various colors/shapes, iron-on or sew-on adhesives, backing materials, scissors, needles, thread, and guidance for applying patches. The goal is quick, reliable repairs or decorative touches without sourcing items separately. |
| Types of patch kits | – Sewing patch kits: patches with thread and needles for hand or machine sewing; durable for fabrics that don’t tolerate heat. – Iron-on patch kits: patches with adhesive backing activated by heat; quick and beginner-friendly but results depend on fabric and washing. – Sew-on with backing: patches plus fusible or non-fusible backing for stabilization. – Fabric patch kits: patches designed for repair and decoration in various shapes/colors/textures. – Patch kit accessories: scissors, fabric glue, tweezers, chalk markers, seam rippers (often included or sold separately). |
| Patch kit essentials (What to look for) | – Patch material compatibility: choose patches that match or complement your fabric. – Adhesive type and heat settings: for iron-on patches, check fabric’s tolerance and washing conditions. – Patch sizes and shapes: mix of small/medium/large for elbows, knees, pockets, and decor. – Backing and stabilization: fusible backings help secure patches; ensure compatibility with fabric and washing. – Tools included: scissors, needles, thread colors, seam rippers. – Patch quality and colorfastness: higher quality resists fading/fraying; colorfast patches look better over time. – Safety and care instructions: guidance on washing, drying, ironing to avoid damage. – Price and value: balance kit contents with cost. – Brand reputation and reviews: look for trusted brands with documented results. |
| How to choose a patch kit (decision framework) | 1) Define your project: repairing clothing, decorating a bag, or starting a craft project. 2) Decide between iron-on and sew-on. 3) Assess fabric compatibility (delicate fabrics may need sew-on or gentle adhesives). 4) Consider size variety. 5) Review included tools. 6) Read reviews for real-world performance. 7) Match budget to a starter kit with essential patch types and a few tools. |
| Starting right away (quick-start plan) | – Identify a simple project (jacket elbow, jeans knee, small tote repair). – Prepare fabric: wash/dry to remove sizing and prep surface. – Trim/place patches: fit the damaged area with a slight margin; align design for decorative patches. – Apply patch using chosen method: iron-on (preheat, press firmly) or sew-on (color-matched thread, tight edge stitches). – Finish and cure: allow patch to set; reinforce edges if heavy. – Wash and inspect: check stability after first wash and reinforce if edges lift. |
| Beginner projects and ideas | – Elbow patches on sweaters/jackets for repairs and style. – Knee patches on jeans for durability and customization. – Decorative patches on backpacks/tote bags. – Upcycled denim from multiple patches. – Pocket revamps to cover wear or add color. |
| Common mistakes and how to avoid them | – Incorrect patch orientation: plan placement for symmetry beforehand. – Too much heat or wrong settings: follow patch/fabric guidelines to avoid damage. – Skipping prep work: pre-wash and iron where appropriate. – Overloading thread or glue: use light application; finish with gentle pressing. – Not considering wash care: choose heat-resistant patches and follow care labels. |
| Care, storage, and long-term maintenance | – Store patches in a dry, cool place to prevent adhesive degradation. – Keep scissors sharp and needles clean for clean cuts and reliable stitches. – Wipe excess glue and allow proper curing time for glue-based patches before washing. – Label contents or inventory patches to manage multiple colors/types. |