
If you’re curious about how to apply iron-on patches, this guide gives you a practical, step-by-step approach that works on denim, canvas, and many cotton blends, with tips for beginners and quick fixes for seasoned crafters alike. It starts with selecting patches suited for fabric repairs, preparing the fabric, and understanding how the adhesive bonds to different textures, including delicate knits, sturdy denim, and tough canvas. You’ll also learn adhesive patches troubleshooting tips, such as testing a small area, choosing the right heat, and avoiding scorching, plus ideas for re-adhesion if the first bond falters after washing. Mastery includes heat settings for iron-on patches, timing, and edge sealing so corners stay flat and seams hold through wash days, with reminders to test a sample patch on an inconspicuous fabric first. By the end, you’ll be able to apply patches cleanly and confidently, turning flaws into intentional style while keeping fabric texture intact and colors vibrant after multiple wears and washes.
Viewed from another angle, patching can be described as surface bonding with adhesive-backed patches that activate under heat. This description uses alternative terms like iron-on embellishments, heat-activated patches, and fabric repair concepts to reinforce the same idea without repeating the exact phrases. By focusing on surface adhesion, compatible fabrics, and care required after application, readers get a broader sense of how these repairs perform in daily wear. LSI principles suggest sprinkling related terms such as washing care, durable finish, fabric compatibility, and patch longevity to create a semantic map that helps search engines connect the topic to user intents.
Frequently Asked Questions
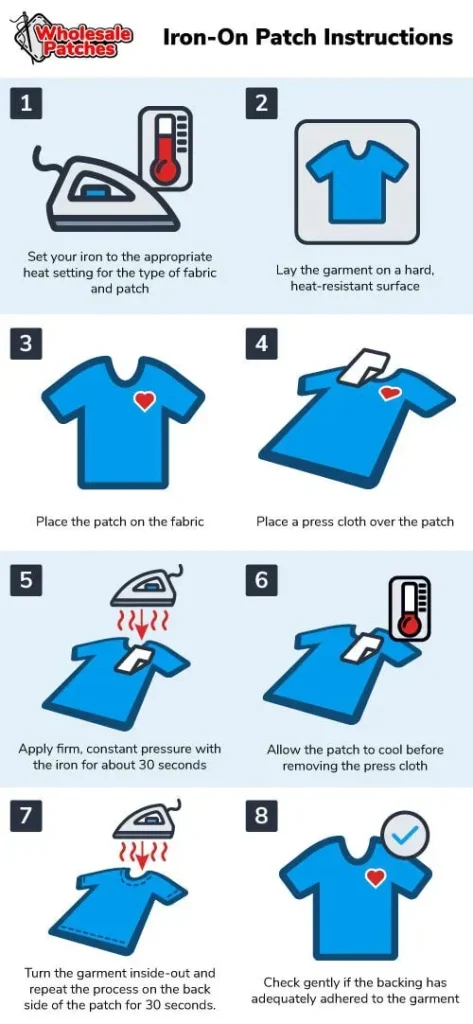
How to apply iron-on patches on cotton or denim, and what prep is required?
Prep the fabric by washing and drying it to remove wrinkles. Place the patch on the desired spot, cover with a pressing cloth, and set your iron to the patch’s recommended temperature. Press firmly with steady, non-circular pressure for about 15–30 seconds, then lift and check the edges. If any edge lifts, re-cover and press again for 10–15 seconds. Let the patch cool fully and gently tug to test the bond. For extra security, you can stitch around the edges after heating. Wait at least 24 hours before washing, then wash inside-out on a gentle cycle and air-dry if possible.
What heat settings for iron-on patches are best when applying patches to thick fabrics like denim?
Use a medium-to-high heat setting, following the patch instructions. For thick fabrics like denim, apply slightly longer press times and firmer pressure, while lighter fabrics may require less heat and shorter presses. Always use a pressing cloth and a clean, flat surface to avoid scorching.
How to troubleshoot adhesive patches when applying iron-on patches that won’t stick?
Ensure the patch and fabric are clean and completely dry. Test on an inconspicuous area to see how heat affects the fabric. Use the correct heat and press time, and apply steady pressure with a pressing cloth. If the patch still won’t stick, try a second application or consider a sew-on alternative for durability; this is part of adhesive patches troubleshooting.
How to use iron-on patches for fabric repair with patches on a backpack, ensuring durability?
Center and secure the patch with light tape before pressing. Choose a robust adhesive-backed patch and use an appropriate heat setting. Cover with parchment paper or a silicone sheet and press for 15–30 seconds, then check the edges. If needed, reinforce with a few small stitches for added durability. Let the patch cure for 24 hours and avoid aggressive washing cycles until fully set.
What patch care and maintenance steps help keep iron-on patches secure after washing?
Patch care and maintenance: Wash with a mild detergent on a gentle cycle, inside-out, using cold water. Avoid high heat in dryers; air-dry whenever possible. Inspect patches after washing and re-press edges if needed. Store patches flat to prevent warping or bending.
When should you choose sew-on patches instead of iron-on patches, and how does that affect how to apply iron-on patches?
Choose sew-on patches for high-motion areas or fabrics that don’t hold heat well, as they offer the strongest bond. If you still apply iron-on patches, you can use them for alignment and then reinforce with stitching along the edges for added durability. This approach combines how to apply iron-on patches with enhanced longevity.
| Key Point | Description | Practical Tips |
|---|---|---|
| What are iron-on patches? | Patches with a heat-activated adhesive on the back; bonds to fabric when heated; quick and beginner-friendly. Some fabrics or patches may require a sew-on option for maximum longevity. | Test on an inconspicuous area; choose patches compatible with your fabric. |
| Why they’re popular | Quick, affordable, easy DIY repairs or decorative flair; ideal for beginners who want to learn without sewing. | Select patches suitable for your fabric thickness and washing patterns. |
| Choosing patches and fabric compatibility | Choose patches with strong adhesive backing appropriate for your fabric type and wash/dry patterns. Thicker fabrics (denim/canvas) need robust adhesive and higher heat; lighter fabrics may require shorter press times or cooler heat. Patch size, color, and border finish affect final look. Test a patch on an inconspicuous area. If unsure, consider a sew-on patch. | Check patch instructions; perform a fabric patch test; consider sew-on if needed. |
| Prep work: gathering supplies and preparing the fabric | Gather supplies: patches, iron/heat source, a trusted pressing surface, a clean ironing board or flat surface, a pressing cloth, parchment/silicone sheet, water spray or damp cloth, scissors/tape/marker. Wash and dry fabric per care label, press to remove wrinkles, align patch, and secure with tape if needed before pressing. | Prep thoroughly to prevent shifting; have everything ready before starting. |
| Positioning the patch for the best look and durability | Place the patch with regard to seams, pockets, or hems. Decide flush or slightly raised for style. Center larger patches on high-stress areas when possible. Use a small amount of tape to hold during initial pressing. | Double-check alignment before applying heat; tape to keep in place. |
| Step-by-step guide: applying patches (summary) | 1) Protect surface and set heat per patch/fabric. 2) Apply steady pressure with parchment/sheet for 15–30 seconds. 3) Check edges and reinforce if needed. 4) Let cool and test bond. 5) Optional finishing touch: additional heat or light stitching. 6) Care after application: wait 24 hours, wash inside-out on gentle cycle; line dry if advised. | Follow patch-specific temperature/times; avoid circular motions; press edges first. |
| Troubleshooting common issues | Problems include patch not sticking, edges curling/peeling, patch looking shiny, fabric puckering, color bleed, or washing issues. | Adjust heat, re-press, use protective cloth, or add stitches; if persistent, consider sew-on patches for durability. |
| Patch care and maintenance | Wash with mild detergents on gentle cycle; turn garment inside out; air-dry when possible; inspect after washing and re-press edges if needed; store patches flat. | Follow manufacturer care instructions. |
| Sew-on options and when to choose them | Sew-on patches offer the strongest bond and are preferred for high-motion areas or when maximum durability is required. You can start with iron-on and add stitches for added security. | Be ready to stitch edges for added durability. |
Summary
How to apply iron-on patches is a versatile skill for repairing worn garments and customizing accessories, offering a fast path to durable, neat results. By selecting the right patches, preparing the fabric properly, and following heat-safe application steps, you can achieve secure adhesion that survives washing and daily wear. If you encounter issues, testing on inconspicuous areas, adjusting heat, or choosing sew-on patches for high-motion areas can help. With practice, you’ll gain confidence in patch projects and extend the life of fabrics you love.