
If you’re asking how to remove embroidered patches safely, you’re in the right place. This guide covers patch removal techniques fabric-safe practices to minimize fiber stress. A selection of tools for removing embroidered patches, such as a seam ripper, small scissors, and tweezers, helps ensure clean results. We’ll explain how to replace embroidered patches without damage and preserve the garment’s finish. From heat considerations to residue removal, you’ll learn steps that protect fibers and keep colors vibrant.
Beyond exact steps, this topic can be framed with terms like patch detachment, embroidery badge removal, or simply patch removal. LSI-friendly language pairs related ideas such as fabric care, garment maintenance, and material-preserving techniques to connect searches. Whether you call it taking off a sewn-on emblem, detaching a heat-activated patch, or swapping an embellishment, the goal remains to protect fabric while updating style. Practical tips include selecting backing materials, testing heat settings on inconspicuous areas, and choosing adhesives or stitches appropriate for each fabric. Using descriptive, reader-friendly language helps guide users toward solutions for removing patches safely or exploring broader patch replacement ideas.
Understanding patch types and fabric-safe removal strategies
Patches come in two main categories: iron-on and sew-on. Iron-on patches rely on heat-activated glue, while sew-on patches attach with stitching. Each type presents its own challenges, and knowing these differences is essential to determine the safest removal path. When learning how to remove embroidered patches safely, you’ll guard fabric fibers, prevent puckering, and minimize color changes as you prepare for a clean replacement.
A thoughtful removal strategy begins with recognizing the patch type and choosing a fabric-safe approach. Iron-on patches demand careful heat control to soften adhesive without scorching the textile, while sew-on patches emphasize seam work and thread management. By understanding these distinctions, you can select patch removal techniques fabric-safe and set the stage for a neat finish when you replace embroidered patches without damage.
Essential tools for removing embroidered patches
Having the right toolkit makes patch removal smoother and safer for the garment. Key items include a seam ripper, small sharp scissors, tweezers, a clean needle and thread for minor repairs, and a soft pressing cloth. These tools for removing embroidered patches help you work with precision, reduce fabric stress, and protect fibers during the process.
Don’t forget residue removal and fabric protection supplies. Rubbing alcohol or a mild adhesive remover helps lift glue without soaking the fabric, while a clean cloth and cotton swabs keep surfaces tidy. Optional items like Fray Check or a gentle fabric glue can stabilize edges after removal, and a hair dryer can soften adhesives for stubborn patches without excessive heat exposure.
How to remove embroidered patches safely: a practical guide
This section focuses on a practical, fabric-safe approach to removing embroidered patches safely, with emphasis on the iron-on method. Start by testing heat on a hidden seam to calibrate your iron settings, then protect the garment with a pressing cloth. Apply controlled heat with the iron at a low-to-medium setting and gently lift edges as the adhesive loosens.
Continue with slow, incremental lifting to avoid fiber damage, and address any stubborn residue with a cotton swab dampened with rubbing alcohol. Once the patch is removed, inspect the area for heat marks or discoloration and clean the surface before laundering. If you plan to replace embroidered patches without damage, ensure the fabric is fully ready to receive a new patch and that residues are completely cleared.
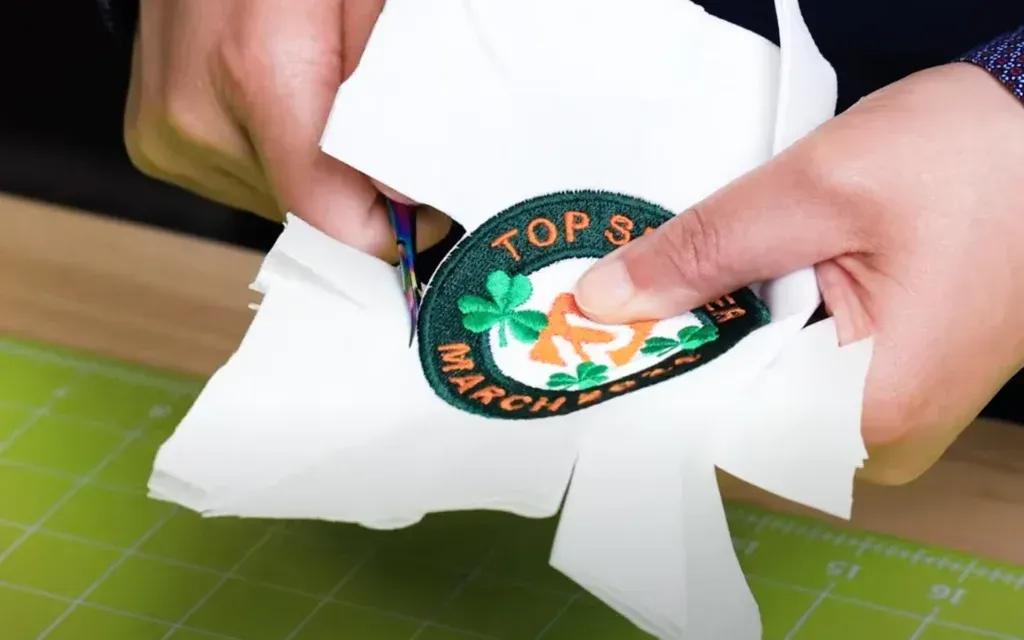
Step-by-step: removing sew-on patches safely
Sew-on patches require access to the stitching along the patch border. Turn the garment inside-out if possible and locate the threads, then use a seam ripper to carefully cut the stitches. Work slowly to avoid pulling or damaging surrounding fabric as you begin to release the patch.
As stitches loosen, lift the patch away and remove loose threads with tweezers. Trim any lingering threads that could snag in the wash, and treat any glue or backing remnants with a gentle adhesive remover or rubbing alcohol on a cotton swab. If the fabric shows slight fraying, consider applying Fray Check or a light running stitch to reinforce the edge before replacing the patch.
Replacing patches without damage: fabric-safe backing and alignment
To replace patches without damage, start with fabric-safe backing or stabilizers that reduce puckering and help the garment retain its shape. Align the new patch with existing seams or design lines, then pin it in place before sewing or applying heat. Using a backing material minimizes stress on the fabric during attachment.
Choose the right method for your fabric—heat-activated patches work well on sturdy textiles with careful pressing, while sew-on patches offer security without heat exposure on delicate fabrics. Always test the chosen technique on a hidden area first to confirm compatibility, then complete the application with gentle stitching or heat according to the patch and fabric type.
Post-removal care and maintenance for longevity
After removing a patch, inspect the fabric for any damage, thinning fibers, or loose threads. Mend small issues with a fine needle and matching thread, or reinforce the area with a light backing to prevent future fraying. A careful approach to post-removal care helps preserve the garment’s original look.
Finish with a gentle wash and air dry to minimize wear on edges and patches. If you’re planning a future patch replacement, keep a quiet, clean area where you can reapply or re-stitch patches without stressing the fabric. Regularly inspecting the area after washing can catch early signs of wear and guide you toward longer-lasting results.
Frequently Asked Questions
How to remove embroidered patches safely from clothes: iron-on vs sew-on methods?
Identify whether the patch is iron-on or sew-on, then test on a hidden area. For iron-on patches, use controlled heat with a pressing cloth, apply 10–15 seconds at a time, and lift the patch gradually to avoid damage; remove adhesive residue with rubbing alcohol. For sew-on patches, use a seam ripper to cut stitches along the edge and carefully lift the patch away. Finish by washing the garment and inspecting for heat damage or fraying.
What are patch removal techniques fabric-safe for removing embroidered patches without damaging the fabric?
Follow patch removal techniques fabric-safe: test heat on a hidden seam, protect the fabric surface, and work slowly. Use heat and gentle lifting for iron-on patches and precise seam ripping for sew-on patches, then remove any remaining glue with a mild adhesive remover. Afterward, launder as recommended and inspect the fabric for signs of distortion.
What tools for removing embroidered patches do you need to remove patches safely?
Have a seam ripper, small sharp scissors, tweezers, a clean needle and thread for repairs, a soft pressing cloth, an iron with adjustable heat, rubbing alcohol or a mild adhesive remover, cotton swabs, a gentle detergent, and optional Fray Check. These tools support safe and efficient patch removal.
How can you remove an embroidered patch safely without leaving residue or damaging the fabric?
Follow a patch-specific approach: test heat on a hidden area, protect the fabric, and for iron-ons apply controlled heat before peeling gradually; for sew-ons, carefully cut stitches and remove threads. After removal, treat any adhesive residue with rubbing alcohol, rinse or wipe clean, and wash the garment. Inspect the fabric for any heat impact or fraying.
How to replace embroidered patches without damage using fabric-safe methods?
After removing the old patch, prepare a clean backing and align the new patch precisely. Choose a fabric-safe method (heat-activated patch with careful pressing or sew-on) based on fabric tolerance, and use backing to minimize puckering. Test on a hidden area first to ensure a damage-free patch replacement.
What post-removal care tips help ensure patch removal is fabric-safe and the garment is ready for a new patch?
Inspect for any fabric damage, stabilize edges with a light stitch if needed, and remove any adhesive residue. Wash per care label and air-dry to minimize heat exposure. Plan the replacement patch with appropriate weight and backing to maintain garment integrity and achieve a clean finish.
| Aspect | Summary | Practical Tips |
|---|---|---|
| Patch types (iron-on vs sew-on) | Iron-on patches use heat-activated glue; sew-on patches rely on stitching. Removal approaches and risks differ (heat damage, fraying). | Identify type first; test on hidden area; plan removal to avoid damage. |
| Tools you’ll need (common across methods) | Seam ripper, small scissors, tweezers, clean needle and thread, iron with dry surface, rubbing alcohol or mild adhesive remover, cotton swabs, detergent, fray check or fabric glue, optional hair dryer. | Prepare workspace; gather items; test areas; have cleanup supplies ready. |
| Removing iron-on patches safely | Steps: test first on hidden area; protect fabric with pressing cloth; apply low-to-medium heat (no steam) for 10–15 seconds; gently lift edges; reheat as needed; peel gradually; remove adhesive residue with rubbing alcohol; launder and inspect for heat damage or fraying. | Avoid yanking; work slowly; keep heat moving and use gloves or tweezers as needed. |
| Removing sew-on patches safely | Steps: expose stitches; cut threads along the border with a seam ripper; cut or pry stitches carefully; lift patch; remove loose threads; treat residue with adhesive remover or rubbing alcohol; reinforce edges with Fray Check or light stitching if needed; wash and inspect. | Take your time; don’t cut garment fibers; trim threads and back edges after removal. |
| Common challenges and handling | Stubborn glue, frayed edges, delicate fabrics, potential color transfer. | Use cautious heat, backing for edges, test cleaners on hidden areas, avoid harsh solvents on dyed fabrics. |
| Post-removal care and repair | Inspect for fabric damage, mend with needle and thread, stabilize edges with light stitching, clean adhesives, air-dry; assess need for backing when replacing patches. | Plan replacement, match patch design, use backing to prevent future fraying, follow care labels. |
| Care and replacement considerations | Fabric-safe backing helps reduce puckering; align patches precisely; choose heat-activated vs sew-on appropriately; test on hidden areas. | Test patches on hidden areas; patch with backing; follow care instructions for washing and drying. |
Summary
remove embroidered patches safely is a practical goal when refreshing clothing without compromising fabric integrity. This guide emphasizes understanding patch types, selecting the right tools, and following careful removal techniques for iron-on and sew-on patches. By planning steps, testing on hidden areas, and applying fabric-safe practices, you can preserve fibers, minimize puckering, and extend the life of garments while reimagining them with new patches. With patience and attention to detail, you can remove or replace patches efficiently and safely, keeping the garment’s appearance and longevity intact.